Direct Laminate Veneers-Part-II
Victoria, Australia
TOOTH PREPARATION
Preparing a tooth for a direct laminate veneer should ideally consist of only removing the pellicle with a little pumice and water slurry on a rubber cup. It is prudent however to carefully remove any staining and bioload from the cervical margins and interproximally with a high speed 12 fluted tungsten carbide bur using a copious spray of water to minimize patient discomfort. There are clinical circumstances when some tooth preparation may be required, usually to “fit” a particular tooth into the proposed arch form; however this should be the final diagnostic decision not the first.
TCA APPLICATION
Even healthy gingival tissues exude serum from the crevice that can cause staining at the cervical margins. A small amount of trichloroacetic acid (TCA) placed in the crevice with the tip of a periodontal probe will chemically cauterize the gingival tissues and arrest crevicular exudates flow during the time the laminate is placed. A solution sodium bicarbonate should be on hand as the antidote when TCA is applied. TCA application to attached gingivae is painless and the white eschar usually disappears by the time the laminates have been completed.
ETCHING
Etch the tooth with 37per cent phosphoric acid for 5 seconds, wash and dry with oil free air.
ADHESION
Exposed dentine needs to be coated with a preferred dentine bonding agent prior to brushing a thin layer of resin bond over the tooth surface; blow gently to eliminate resin clumping and cure for several seconds.
WHITE TINT
Placing a thin layer of white tint over all the surfaces has the effect of brightening the completed laminates helping a patient achieve a sparkling smile.
A successful series of laminates requires that they all have similar “values”. This can be a challenge with a 1mm thick direct laminate and teeth have been stained or root filled. Thinly layering a little extra white tint over the stained surface until the tooth has achieved the same “value” as the surrounding teeth overcomes this problem.
SHADE SELECTION
Shade selection varies depending upon the age, personality and gender of the patient.
Young women usually require a bleached smile so a base shade of B1 is appropriate with body shades of A1 and B1 above.
The appropriate shade for more mature women depends to a large extent upon their personalities and whether they want the laminates to be part of their made up “face”. Usually an A1 base with A2 and A1 body shades work well.
For some older women a B1 smile works well and for others it may be a disaster. Tact and judgement are useful skills to develop when treatment planning.
Young men look good with an A1 base and A2 and A1 body shades. Older males are usually after a natural smile. An A2 base and A3 and A1 body shades work well here unless the patient is in the throes of some sort of a midlife crisis and demands an “Arlington” smile
RESIN BOND
A layer of bonding resin is placed between each increment of composite as the laminate is layered. This improves handling of the next increment of composite and helps to eliminate air bubbles from the laminate.
BASE SHADE
The base shade of micro hybrid resin is placed to provide the body shade of the laminate. These composites have excellent optical properties and add fluorescence to the completed veneer. As the completed laminate is usually no more than 1 mm thick it is important to thin the base layer down to about half a millimetre to leave room for the microfill resin layers
on top. Photocure the layer for 5 seconds, partial curing helps reduce the polymerization stress and saves time in laminate placing. A final 10 second cure will assure the laminate is sufficiently cured. Fig 1.

Fig 1: After placing white tint, a half millimetre thick base layer of micro hybrid composite resine is laid over the surface of the tooth.
CERVICAL SHADE
A microfill composite resin is used to place the cervical shade. This is usually a slightly darker hue than the body shade and helps creates a life like laminate. The cervical shade is built up at the cervical margins and thins to a feather edge towards the incisal margin. Concentrating on placing a small increment at the cervical region assists the clinician to achieve margins that closely adapt to the gingival tissues and facilitates later contouring of the laminate. Photocure the resin for 5 seconds. Fig 2.
BODY SHADE
Another increment of microfill resin is used for the body shade. Layer the resin to blend with the cervical shade and slightly overlap the incisal edge. Prior to curing the body shade place a series of small grooved into the soft resin, extending from the middle of the tooth over the incisal edge. Fig 3. Into these grooves place a miniscule amount of white tint and fold the resin into the groove to create a fine lamella line in the facing. The laminate can be further characterised by tiny drop of white or red tint to add warmth and if matching an adjacent tooth cervical characterisation may be necessary. Photocure for the resin 5 seconds. Fig 4.
Fig 2: A small increment of microfill resin is plased at the cervical marginof the tooth, thinning to a feather edge towords the incisal edge.

Fig 3: A body shade of microfill resin is placed over the incisal 2/3 of the tooth. Thin grooves are made in the surface of the uncured composite extending over the incisla edge.
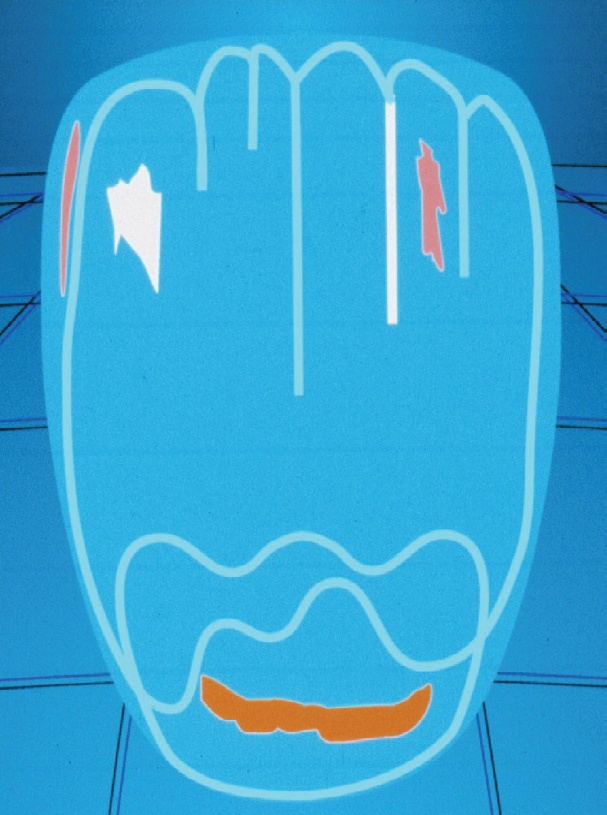
Fig 4: Miniscule amounts of white tint are placed into the grooves and folded over before curing. At this stag other tints may be added to characterise the laminate
ENAMEL SHADE
A final increment of microfill semi translucent enamel or incisal shade is placed over the incisal third to add translucency to the laminate and cured for 5 seconds. Fig 5.
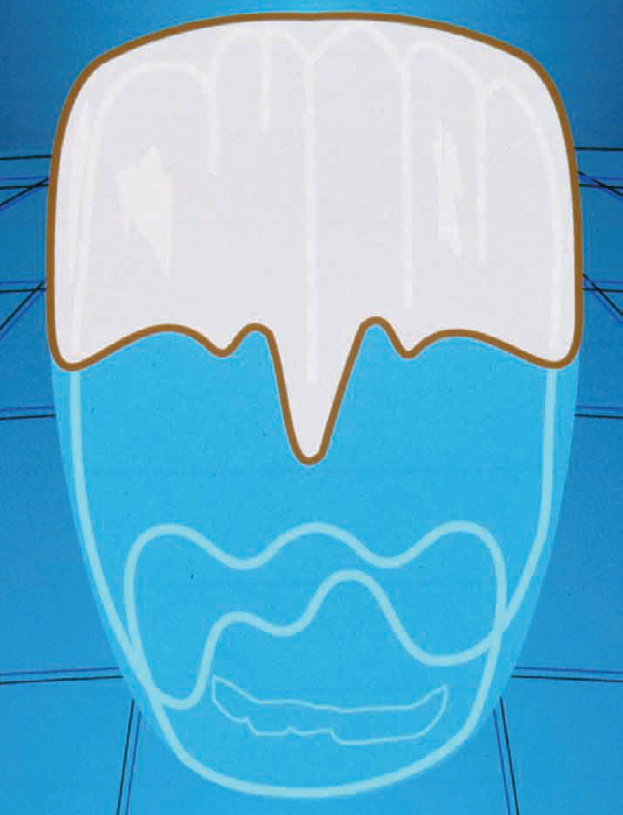
Fig 5: A thin layer of microfill translucent enamel shade is placed over the incisal third of the laminate.
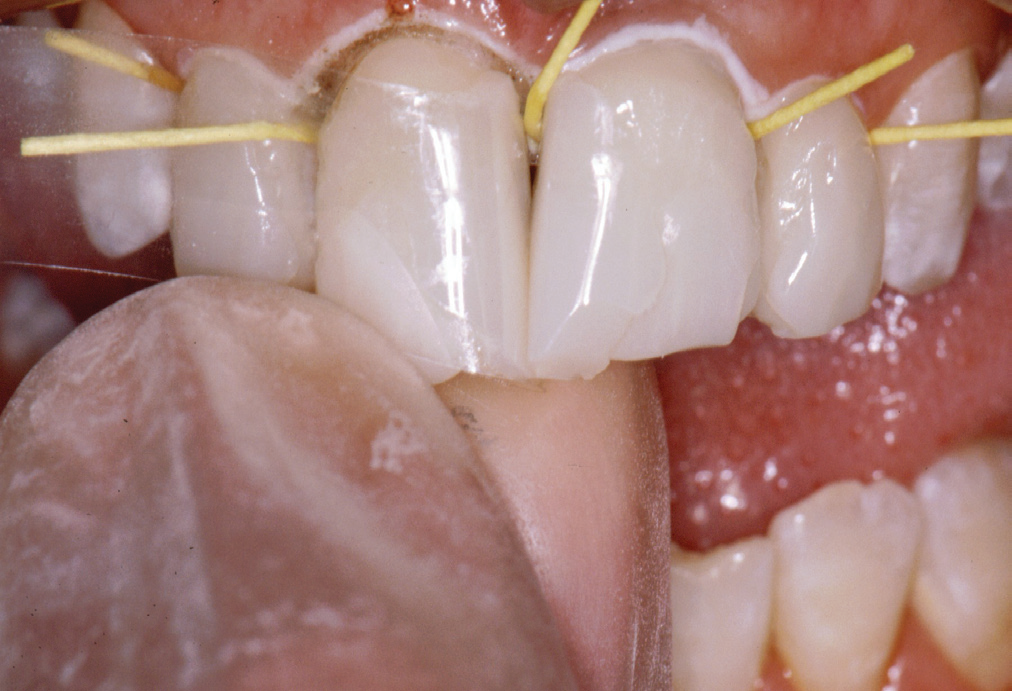
Fig 6: Paper points are placed interproximally to prevent resin overhages and a Mylar placed, into which translucent. The strip is folded over and the resin is cured.
PROXIMAL SURFACES
To place the proximal surfaces, paper points are inserted into the interproximal spaces and a Mylar strip gently wedged into place. After brushing some resin bond into the space, insert a further increment of microfill enamel or incisal shade. Fold the Mylar strip over the facial and lingual surfaces and spot cure for 5 seconds. Fig 6. The semi translucent shade creates a 3D effect at the margins and gives depth to the laminate, even though it will contour back to 1 mm in thickness.
After layering the laminate and prior to contouring the laminate was photocured for a further 10 seconds. Fig 7.
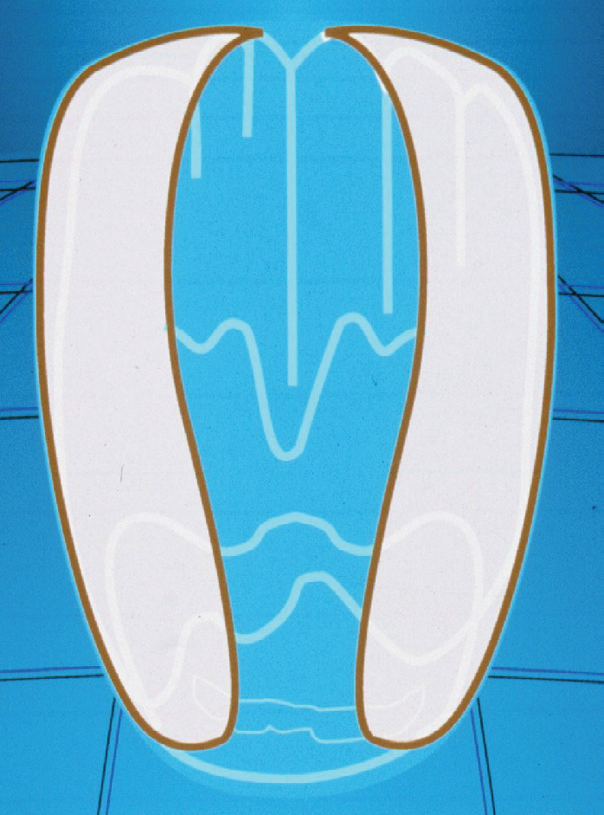
Fig 7: The enamel microfill gives a slighty translucent effect at the proximal margins, creating a 3D effect with the laminate.
CONTOURING AND POLISHING
Contouring may be carried out with coarse discs, high speed diamonds or both depending upon a clinician’s preference. Polishing is achieved with increasingly finer discs that enable microfill composite resin to achieve a permanent high gloss that remains for the life of the laminate. Fig 8.
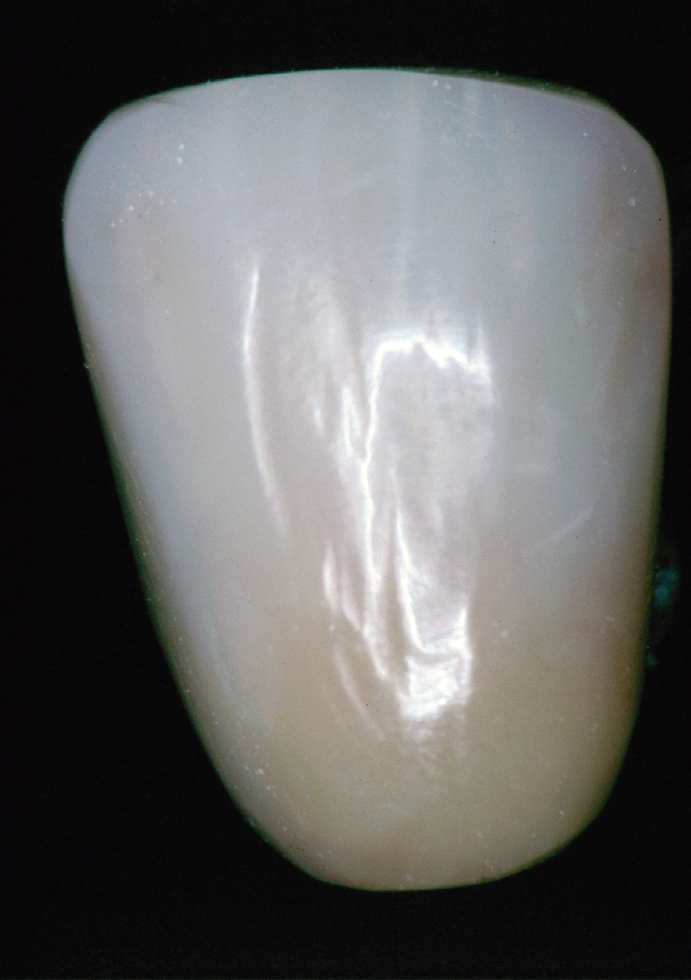
Fig 8: The Completed laminate shows a slightly darker shade at the cervical region, associated with an increasing translucency towords the incisal rigion. The white lamella are just visible below the surface adding to the life-like appearance of the laminate. Subtle changes in surface contouring help to reflect ligte from the surface.
Contouring a laminate into a smile will be demonstrated in a further article in this series.
DISCLAIMER
“Published in the Australian Dental Association News Bulletin July 2008 Reprinted with permission of the editor and Author.”
Disclaimer from Guident
The views and opinions expressed in articles published in Guident are solely those of the authors and do not necessarily reflect the views of the editors, the editorial board or the publisher, Ivory India. Guident does not endorse any product, technique or treatment described. Clinical content is intended for qualified dental and medical professionals and is not a substitute for individual clinical judgement. Guident, its editors and the publisher accept no liability for any consequence arising from the use of information published in the journal.
How to cite this article
Dr. Geoffrey M Knight. Direct Laminate Veneers-Part-II. Guident. 2013 Sep;6(11). Available from: https://guident.in/articles/aesthetic-dentistry/direct-laminate-veneers-part-ii.html