Principles of Tooth Preparation: Part-6
MIK Dental, Mumbai, India
CENTRAL INCISOR PREPARATION FOR A LIDISI CROWN
The ultimate desire when restoring an anterior tooth is aesthetics. Dentists often find themselves culprit for overemphasizing this aspect and in the process tend to loose the balance that needs to be maintained with the biological and the mechanical principles of tooth preparation. over prepared anterior teeth often are at risk of catastrophic fracture, owing to the angular nature of functional forces in this segment. The question one should ask is; what good is an aesthetic prosthesis, if it does not survive the test of time?
Conversely, inadequate tooth reduction can result in compromised aesthetics and often chronic gingival inflammation owing to the overhanging margin. Lipstick stains on upper anterior crowns often indicate an under-reduced tooth or an over-contoured prosthesis.
Fig. 4.131: Tooth preparation should follow a two plane reduction in order to fulfill all the three principles of tooth preparation.
Fig. 4.132: Single plane reduction can result in either an aesthetic failure (left) or an over-contoured prosthesis (center) or possible pulpal damage (right).
Re-establishing the correct anterior guidance is of utmost priority when restoring anterior teeth. An altered guidance can result in tooth mobility, pathologic migration, fracture of anterior teeth, attrition of anatagonistic teeth and eventually result in development of occlusal interferences in posterior teeth. A positive fremitus test is diagnostic towards an unfavorable anterior guidance, as it identifies teeth that are under excessive stress owing to a faulty guidance pattern.
This segment of the chapter describes the ideal protocol to be followed, for step-by-step reduction of a maxillary central incisor to receive a LiDiSi crown.
Preparation of a pre-treatment putty index
Fig. 4.133, 4.134: For beginners, it is advisable to fabricate a pretreatment index using putty (A or C-Silicone) extending over the tooth to be prepared and at least one adjacent tooth on either side. This index is sliced mid-sagittally across the tooth being prepared. Optosil C-Silicone from Heraeus Kulzer was used for this documentation.
Steps in preparation
Just like for the molar described in the previous section, following a logical sequence when preparing the anterior teeth is also advisable.
Preparation Sequence:
- Labial preparation.
- Interproximal preparation.
- Palatal margin preparation.
- Incisal preparation.
- Lingual fossa preparation.
- Finishing of the preparation.
1. LABIAL PREPARATION
Desired Amount of Preparation: Margin: 0.8-1 mm; Axial Surface:
1.2-1.5 mm
Margin Architecture: Deep Chamfer
Bur used: DC 1.4 (Cluster 2)
The labial surface of a maxillary central incisor has two planes; the gingival plane and the incisal plane. It is imperative to ensure that the final preparation has adequate reduction in both these planes.
Fig. 4.135: Using a DC 1.4 bur, a depth groove is made in the gingival plane (in the center of the tooth) by sinking the bur tip to half its diameter. Sinking the bur any deeper carries the risk of developing a lip of unsupported enamel at the margin.
Placing depth grooves before embarking on larger areas of tooth reduction helps achieve a controlled removal of tooth structure.
Fig. 4.136: Two additional grooves are then made (in the gingival plane) along the mesial and distal line angles of the tooth. Note, how the depth grooves shallow out (and eventually fade away) as they approach incisally where the facial curvature of the surface is the greatest.
Fig. 4.137: Using the same bur, a depth orientation groove is then made in the incisal plane. Here again, the bur tip is sunken to only half it’s diameter.
Fig. 4.138: Two or more depth grooves are placed in the incisal plane (depending on the width of the labial surface).
Fig. 4.139: Depth grooves along the two planes can be clearly distinguished.
Fig. 4.140: Using the same bur, enamel islands are first removed in the gingival plane. It is important that the preparation margin is placed slightly supra-gingival at this point and that it follows the gingival contour.
Fig. 4.141: The incisal plane is then reduced, ensuring all enamel islands between the depth grooves are reduced completely
Fig. 4.142: It is important to ensure that the preparation is in harmony with the labial contours of the adjacent teeth.
This can be assessed by viewing the tooth from the lateral aspect.
2. PROXIMAL PREPARATION
Desired Amount of Preparation: Margin: 0.8-1.0 mm; Axial Surface:
1.2-1.5 mm
Margin Architecture: Deep Chamfer
Bur used: MI 0.5 (Cluster 3)
Following labial reduction, the proximal contacts are to be opened. In order to prevent damage to the adjacent teeth, the same technique as described previously is used.
Fig. 4.143, 4.144: The MI 0.5 bur is placed slightly above the interdental papilla and used in a sawing motion to slice through the interproximal surface, ensuring that a fine sliver of enamel remains between the tooth being prepared and the adjacent tooth.
Fig. 4.145, 4.146: The same procedure is then repeated along the other proximal surface. Above: Labial view; Below: Palatal view.
Fig. 4.147: The proximal contacts are then opened by breaking the sliver of enamel. This is done with the help of a straight probe.
3. PALATAL MARGIN PREPARATION
Desired Amount of Preparation: Margin: 0.5-0.8 mm; Axial Surface: 0.5-0.8 mm
Margin Architecture: Deep Chamfer
Bur used: DC 1.4 (Cluster 2)
Following reduction of the proximal surfaces, attention is paid towards preparing the palatal axial margin.
Fig. 4.148: The DC 1.4 bur is used to score one depth groove in the center of the palatal surface by sinking the bur tip slightly less than half its width. It is advisable to place this groove slightly supra-gingival in order to conserve tooth structure.
This portion of the tooth is responsible for providing the necessary resistance to displacement of anterior prosthesis. Thus, when reducing this critical area, care needs to be taken to ensure the bur is oriented at the correct angle.
Fig. 4.149: Image depicts the correct angle of the bur, which is relatively parallel to the gingival plane of the labial surface. This helps in achieving maximum resistance from the palatal axial wall.
Fig. 4.150, 4.151: Using uni-directional motion, the preparation is then extended from the palatal groove into the mesial and distal interproximal margin.
4. INCISAL PREPARATION
Desired Amount of Preparation: 2 mm
Burs used: IR 2.0 (Cluster 6) followed by any long bur
Following preparation of all axial surfaces, the incisal edge is reduced.
Fig. 4.152: The IR 2.0 bur is a self-limiting bur and thus, ideally suited to create depth grooves of 2 mm. It is placed such that the non-cutting shaft sits flush with the incisal edge, allowing only the working tip to be in contact with the tooth.
Fig. 4.153: This bur is then run across facio-palatally along the mid-incisal edge (in one stroke), thereby leaving a 2 mm deep grove.
Fig. 4.154, 4.155: Two additional grooves are made, to the mesial and distal of the mid-incisal groove.
Fig. 4.156: Next, any long bur is used to connect these grooves. Maxillary incisal edge reduction should be done with the bur angled slightly palatally.
This ensures that the reduction is performed parallel to the original incisal edge angle and (more importantly) perpendicular to the forces of mastication.
Fig. 4.157: It is advisable to reduce the last 0.5 mm of the incisal edge with a coarse Sof-Lex disc from 3M. This prevents the grooves from deepening further, thereby preventing inadvertent over-reduction of the incisal edge beyond 2 mm.
5. LINGUAL FOSSA PREPARATION
Desired Amount of Preparation: 0.5-0.8 mm
Bur used: CR 2.3 or CR 2.8 (Cluster 5)
Here, adequate clearance during all functional movements is paramount. This is to ensure that, the desired anterior guidance can be re-established in the final prosthesis.
Fig. 4.158: In order to achieve adequate reduction, the CR bur is held such that it’s widest portion sits into the deepest aspect of the palatal concavity. This ensures that desired reduction is achieved in the middle third of the lingual fossa.
Fig. 4.159: Too steep an angle. This would reduce the height of the palatal axial wall, thereby compromising the resistance form and can also cause over-thining of the incisal edge.
Fig. 4.160: Too shallow an angle. This would result in under-reduction of the tooth, thereby causing premature contact in MIP and interferences in excursion.
Fig. 4.161: To reduce this surface, the CR bur is moved mesio-distally across the fossa and as the bur approaches incisally, it is straightened out. This ensures uniform reduction and maintenance of the palatal curvature.
6. FINISHING OF THE PREPARATION
Burs used: DC 1.8F, DC 1.2F (Cluster 1 and 2)
Once basic preparation is completed, finishing of the preparation is undertaken.
Fig. 4.162: First, the DC 1.8F bur is used to half its depth on the labial aspect of the preparation. The large head of this bur helps remove any lip of enamel that may have formed earlier. At this phase, the preparation margin can be taken closer to the gingival crest (if necessary).
Fig. 4.163: Proximal surface may not have enough clearance to allow the wide DC 1.8F bur to pass through. Thus, a thinner DC 1.2F is used to finish the mesial and distal proximal margins. Here, it is important to follow the pre-existing gingival architecture (interdental col) of the tooth.
Fig. 4.164: The same DC 1.2F is used to finish the palatal axial margin as well.
Fig. 4.165: A Sof-Lex Spiral from 3M can be used to finish the lingual fossa area of the preparation.
It is important to ensure that clearance is achieved not just in maximum intercuspation, but throughout the entire path of incisal guidance. This can be confirmed with the use of PrepGauge from MIK Dental.
FINAL LOOK OF THE PREPARATION
The final preparation should look smooth and be free of undercuts. All 360° of the margin should be continuous and visible when seen from the incisal view.
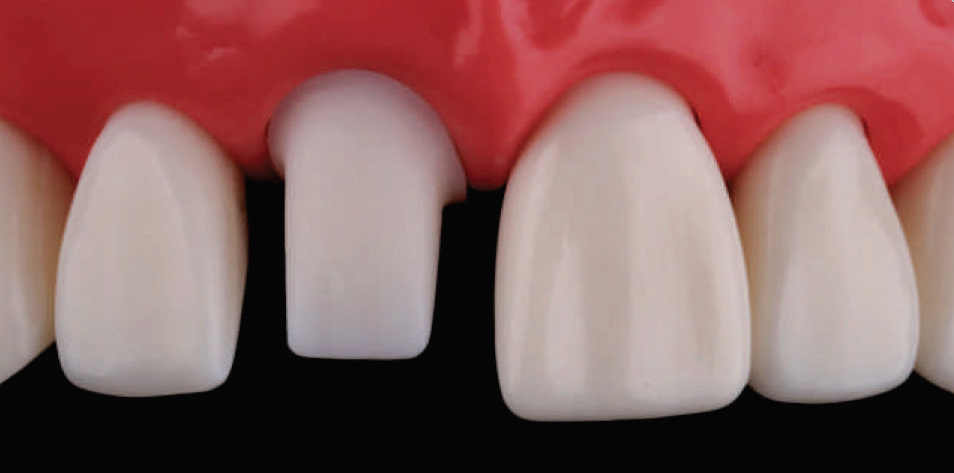
Fig. 4.166: Final Preparation: Labial View.
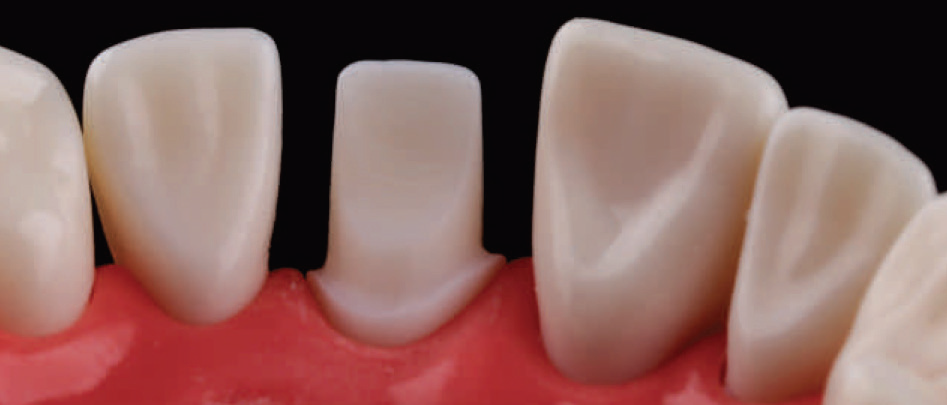
Fig. 4.167: Final Preparation: Palatal View.
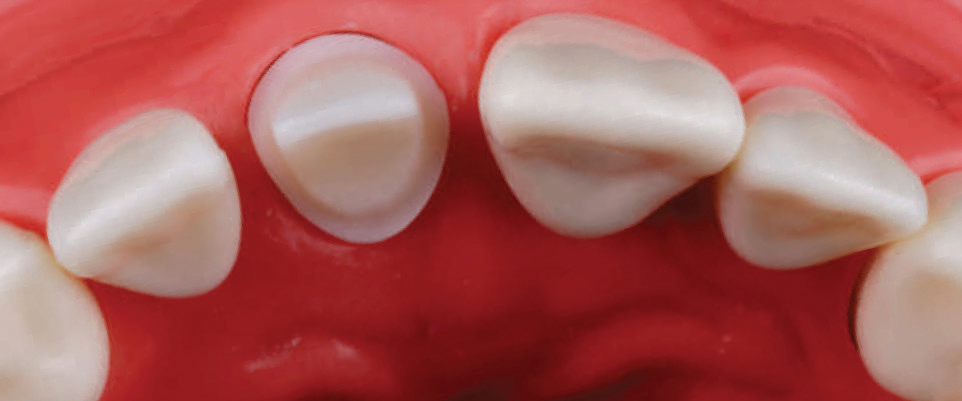
Fig. 4.168: Final Preparation: Incisal View.

Fig. 4.169: Final Preparation: Lateral View.
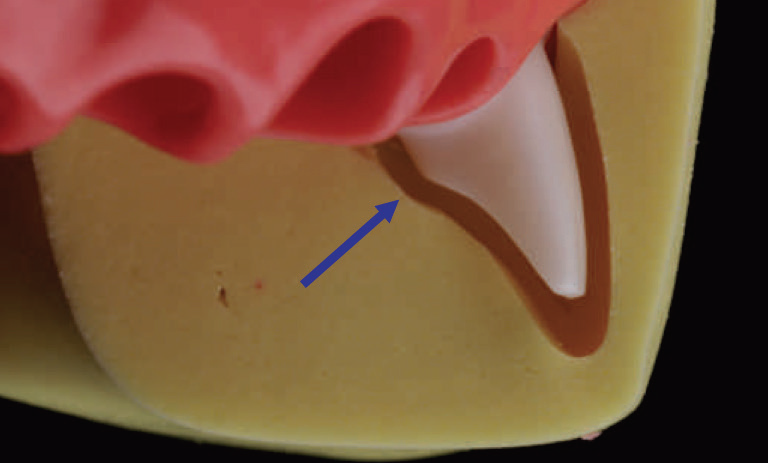
Fig. 4.170: Pre-treatment index can be used to evaluate the uniformity and adequacy of reduction.
NOTE: The distinct curve in the cingulum reduction (blue arrow) divides the palatal surface into a relatively horizontal component and an upright vertical segment. This provides a step-like resistance area to counter the tipping effect of forces from the lingual aspect. This adds to the retention and resistance form of the preparation.
NOTE: This article is a direct extract from the book “Clinical Fixed Prosthodontics” by Dr. Moez I. Khakiani. With over 1700 colored illustrations, clustered into 23 chapters that span over 400 pages, this book is the ideal atlas for every clinicians who wishes to improve on their clinical skills and serve their patients with the highest level or oral care. To purchase the same call on +919111212912.
Disclaimer from Guident
The views and opinions expressed in articles published in Guident are solely those of the authors and do not necessarily reflect the views of the editors, the editorial board or the publisher, Ivory India. Guident does not endorse any product, technique or treatment described. Clinical content is intended for qualified dental and medical professionals and is not a substitute for individual clinical judgement. Guident, its editors and the publisher accept no liability for any consequence arising from the use of information published in the journal.
How to cite this article
Dr. Moez I. Khakiani. Principles of Tooth Preparation: Part-6. Guident. 2019 May;12(6). Available from: https://guident.in/articles/prosthodontics/principles-of-tooth-preparation-part-6.html