Occlusal Contouring
Victoria, Australia
As older patients struggle to hold onto their heavily restored teeth, restorative dentistry is becoming increasingly demanding. There are few procedures more challenging and time consuming than contouring the occlusal surface of a large composite resin restoration that incorporates occlusal overlays on associated cusps.
The use of an occlusal matrix (freezer bag) will identify the central fossae and assist in developing incline planes, however there are many clinical situations where this is not practicable and freehand contouring is required.
The following contouring technique provides a sequential process that helps avoid the picking up and poking around with various burs trying to fit a restoration into the opposing occlusion.
CLINICAL TECHNIQUE
Figure 1 shows a large occlusal overlay composite and glass ionomer co-cured restoration on a second upper molar immediately following the removal of the matrix band.
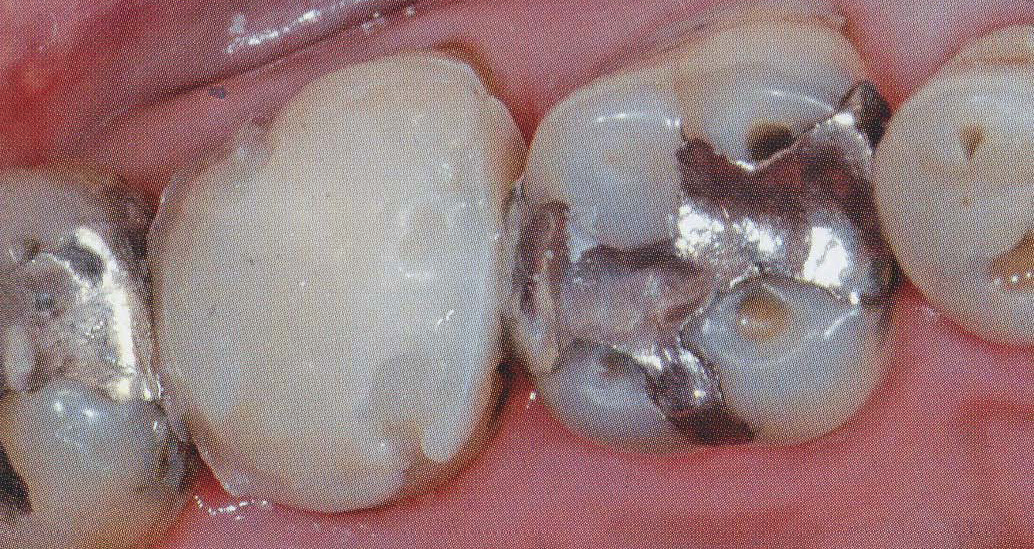
Fig 1: Occlusal overlay composite restoration on a second upper molar following the removal of the matrix band.
Removal of resin flash on the buccal and lingual surfaces and initial occlusal contouring was carried out with a high speed pointed cone diamond bur. The occlusal surface was reduced until the tip of each cusp was just sub surface to the resin. Figure 2
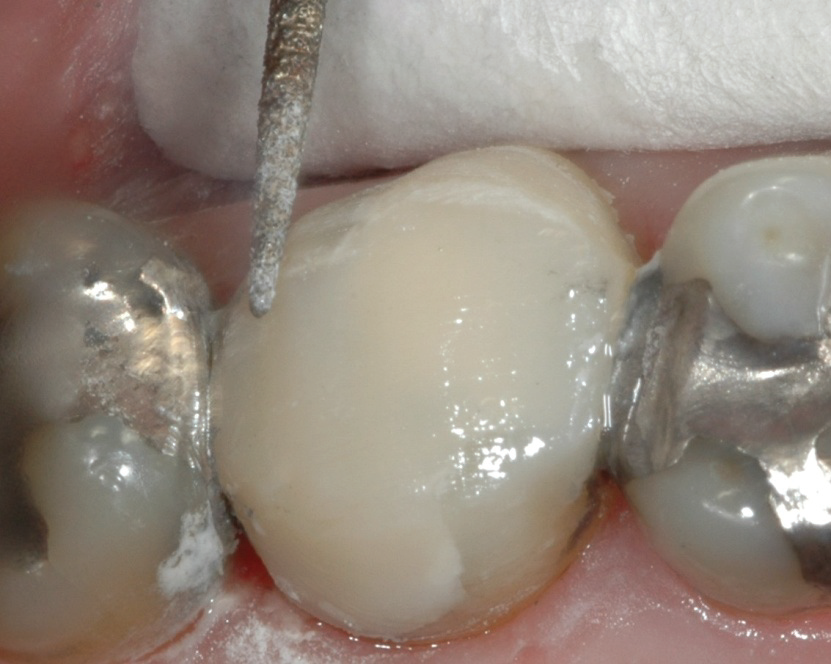
Fig 2: Removal of resin flash on the buccal and lingual surfaces and initial occlusal contouring was carried out with a high speed pointed cone diamond bur.
A piece of articulating paper was next placed over the restoration and the patient asked to close in a retruded occlusion. This identifies the position of the cusp tips on the opposing arch and provides a template for the initial occlusal carving. Figure 3

Fig 3: A Piece of articulating paper was next to placed over the restoration and patient asked to close in a retruded occlusion.
Using the occlusal markings as a guide the initial occlusal contouring was carried out with a high speed round diamond bur to a prescribed pattern depending upon the tooth being restored. Figure 4
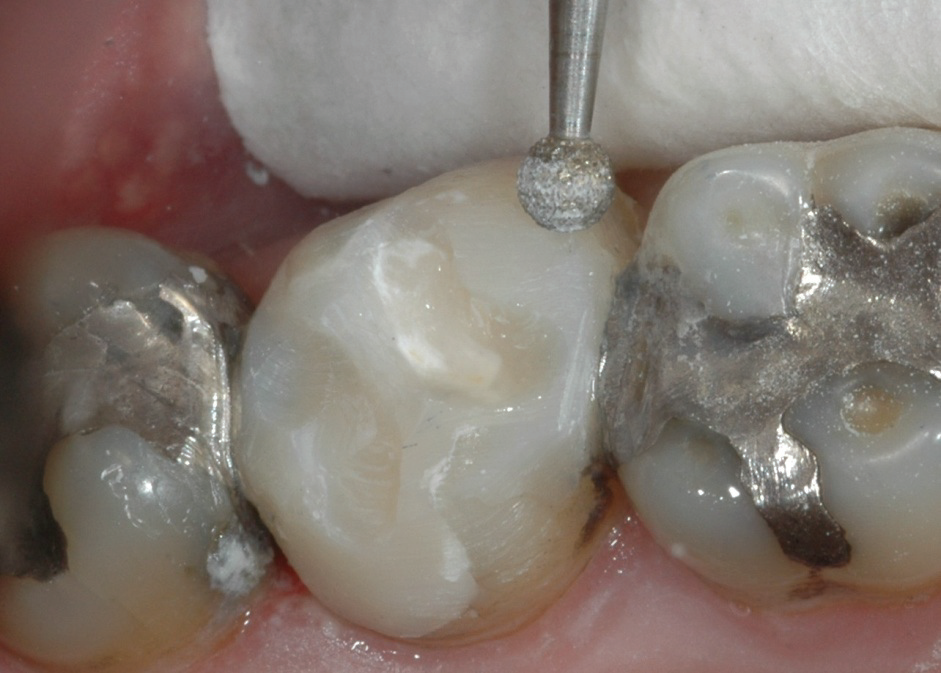
Fig 4: Using the occlusal markings as a guide the initial occlusal contouring was carried out with a high speed round diamond bur.
For Upper Molars two kidney shaped grooves are carved. One from the buccal curving towards the mesial and one from the lingual curving towards the distal Figure 5
For Bicuspids two straight bucco lingual grooves are carved on the mesial and distal aspects of the occlusal surface. Figure 6
For Lower First Molars three grooves are carved, a small straight groove on the mesial, a larger straight bucco lingual groove centrally and a smaller kidney shaped groove distally from the buccal towards the distal margin. Figure 7
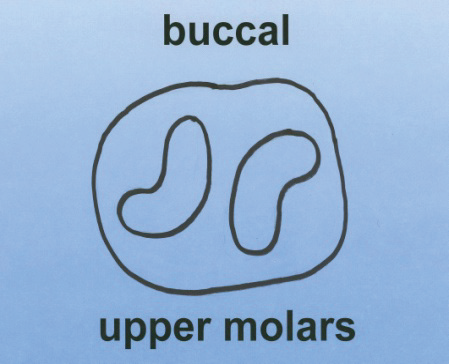
Fig 5: For the upper molars, two kidney-shaped grooves are carved: One from the buccal towards the mesial and one from the lingual curving towards the distal.

Fig 6: For Bicuspids, two straight bucco lingual grooves are carved on the mesial and aspects of the occlusal surface.
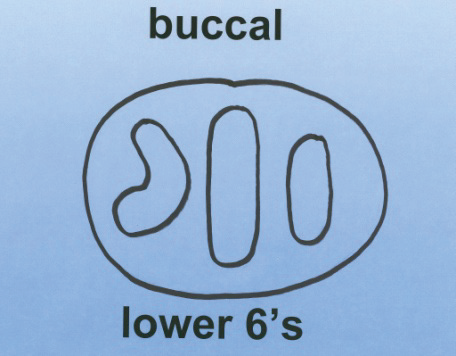
Fig 7: For lower first molar, three grooves are carved: a small straight groove on the mesial, a larger straight bucco lingual groove centrally and a smaller kidney-shaped groove distally from the buccal towards the distal margin.
For Lower Second Molars three grooves are carved. Two smaller grooves near the mesial and distal margins and a larger bucco lingual groove through the central aspect of the occlusal surface. Figure 8
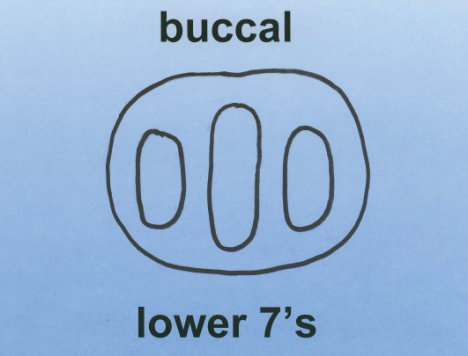
Fig 8: For the lower second molar: three grooves are carved: two smaller grooves near the mesial and distal margins and a larger bucco lingual groove through the central aspect of the occlusal surface.
Once the occlusal grooves had been placed more definition was carved into the inclined planes using a slow speed trapezoid shaped diamond bur (Intensiv 1106 or similar). Use the incline planes on the cusps of adjacent teeth to indicate the angle and depth required. This bur can also be used for initial carving of the mesial and distal margins of the restoration. Figure 9
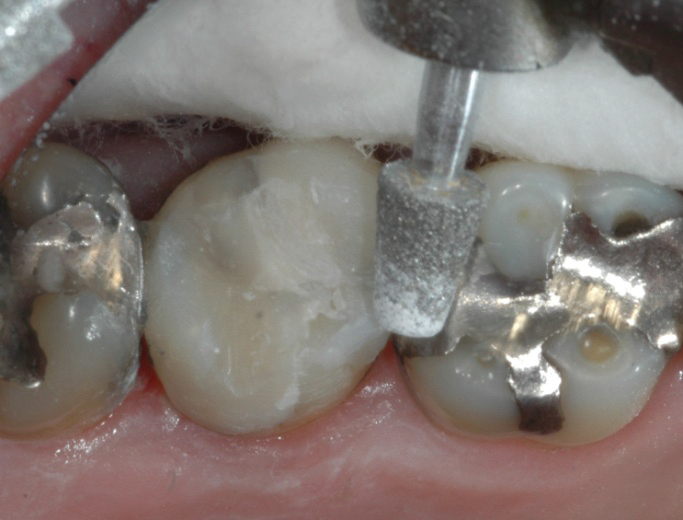
Fig 9: Once the occlusal grooves have been placed more definition can be carved into the inclined planes using a slow speed trapezoid shaped diamond bur.
During carving with the trapezoid diamond bur articulating paper was used to determine there were no interferences in either centric occlusion or protrusive and lateral movements of the mandible. Figure 10
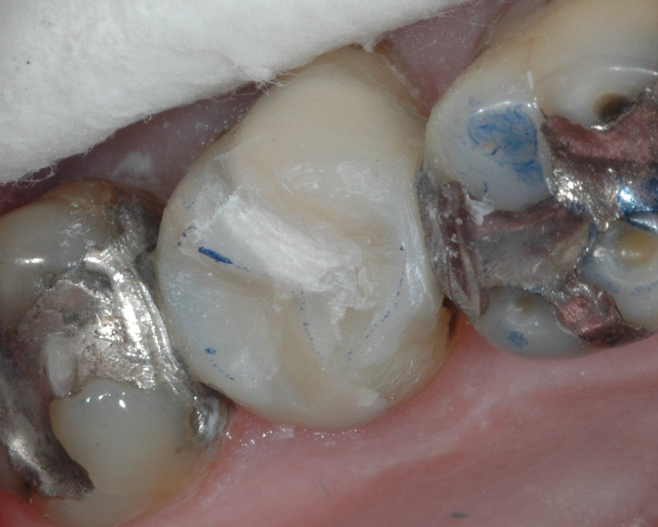
Fig 10: During carving with the trapezoid diamond bur articulating paper was used to determine there were no occlusal interferences.
Once the occlusion had been cleared a small coarse extra thin Sof-Lex disc was used to smooth over the buccal, lingual and occlusal surfaces and provide final contouring on the mesial and lingual margins. Figure 11
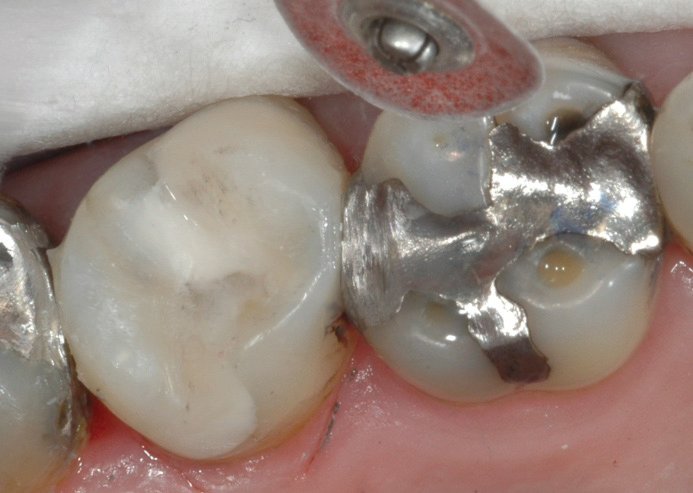
Fig 11: Once the occlusion had been cleared a small coarse extra thin Sof-Lex disc was used to smooth over the buccal, lingual and occlusal surfaces and provide final contouring on the mesial and lingual margins.
The restoration was polished with silicone rubber cups (rubber cups facilitate polishing of cusps and incline planes) of reducing grit size until a high luster was achieved. Patients are always aware of a rough composite resin surface in their mouths. Figure 12
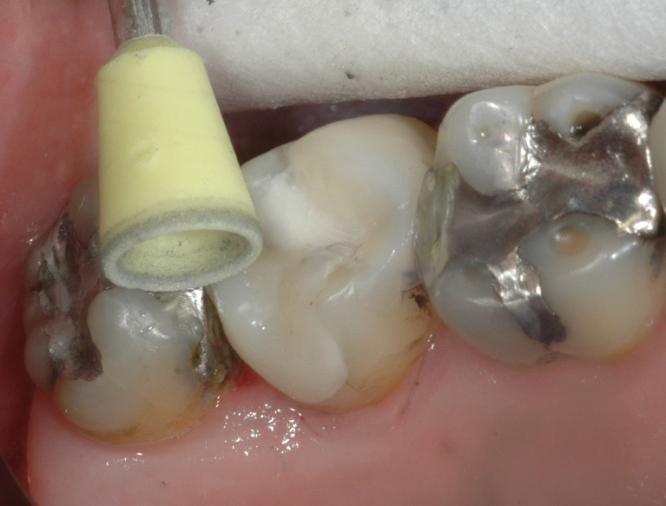
Fig 12: The restoration was polished with silicone rubber cups of reducing grit size until a high luster was achieved.
Figure 13 shows the completed restoration. Note that there is some glass ionomer cement present on the occlusal surface of the restoration. Providing glass ionomer cement does not encroach upon cusp tips or marginal ridges, this will have no adverse consequences for the restoration.
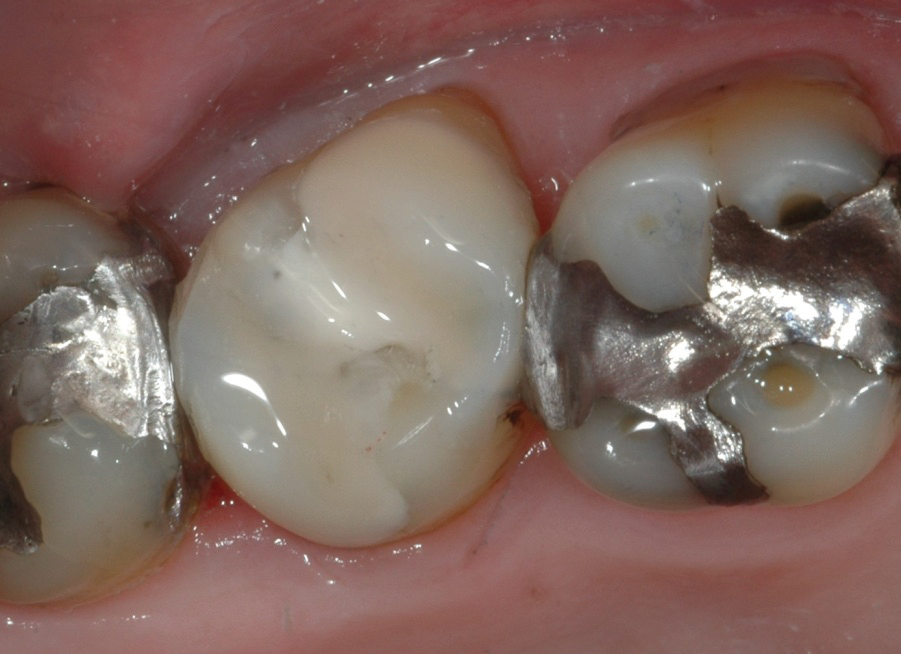
Fig 13: Shows the completed restoration.
An angled photograph of the finished restoration gives a better perspective of the occlusal contours that can be achieved using this technique. Figure 14
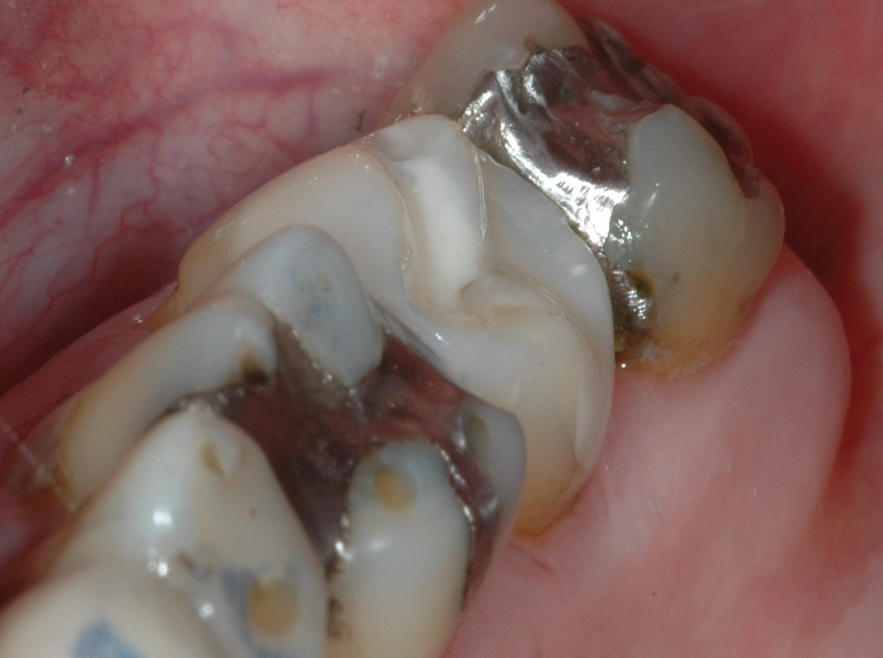
Fig 14: An angled view of the finished restoration gives a better perspective of the occlusal contours that can be achieved using this technique.
CONCLUSIONS
While occlusal contouring remains a challenge, this technique provides for the sequential use of various contouring and finishing tools that enables clinicians to achieve a functionally acceptable and time efficient occlusal surface on large composite resin restorations.
DISCLAIMER
Published in the Austrailion Dental Association News bulletin Nov 2007. Reprinted with permission of editor and author.
Disclaimer from Guident
The views and opinions expressed in articles published in Guident are solely those of the authors and do not necessarily reflect the views of the editors, the editorial board or the publisher, Ivory India. Guident does not endorse any product, technique or treatment described. Clinical content is intended for qualified dental and medical professionals and is not a substitute for individual clinical judgement. Guident, its editors and the publisher accept no liability for any consequence arising from the use of information published in the journal.
How to cite this article
Dr. Geoffrey M Knight. Occlusal Contouring. Guident. 2014 Oct;7(11). Available from: https://guident.in/articles/aesthetic-dentistry/occlusal-contouring.html