
Isolation in Clinical Dentistry: Part-5
MIK Dental, Mumbai, India
CLINICAL TIPS AND TRICKS

Fig. 3.137, 3.138: Secure the clamp with a long strand of floss tied on it. This helps prevent any accidental aspiration or ingestion. The floss should be tied and secured with several rounds (left), as with a single round (right) there is a possibility for the knot loosening up.


Fig. 3.139: Mark an ‘x’ on the 1st quadrant area of the dam sheet prior to punching holes. This helps maintain its orientation and avoids confusion when adapting the frame.
Fig. 3.140 shows properly punched holes on left and improper or incompletely punched holes on the right.
When punching holes, always punch all the way into the sheet until the sheet releases itself from the punch hole. This is done to make sure a proper round hole is made, else the partially cut ring may not separate completely from the sheet.
Check the nature of interdental contacts with dental floss prior to placing the rubber dam. In case of very tight contact, it helps to place a wedge interdentally for a few minutes, as this brings about a small separation.
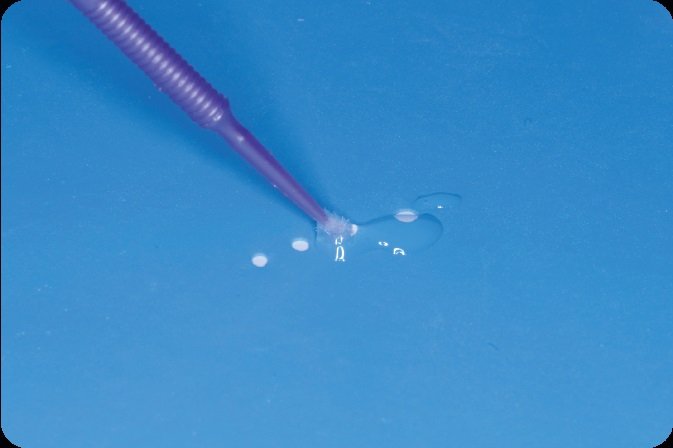
Fig. 3.142: Glycerine gel or any water soluble lubricant applied on the inner side of the rubber dam sheet or tooth helps to slip the dam sheet into interdental areas with ease.
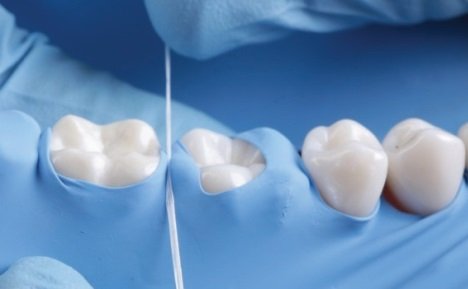
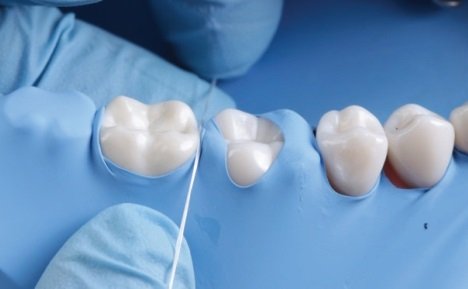
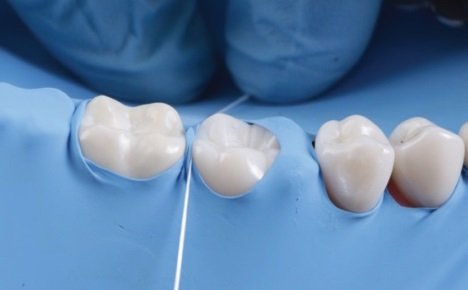
Fig. 3.143-3.145: When using floss to push the dam sheet into tight interdental contacts, do not position the floss over the rubber dam sheet (top). Instead, pull the sheet either to the mesial or distal of the contact (middle, bottom) and then push it apically. This prevents the floss from causing an accidental tear in the dam sheet.
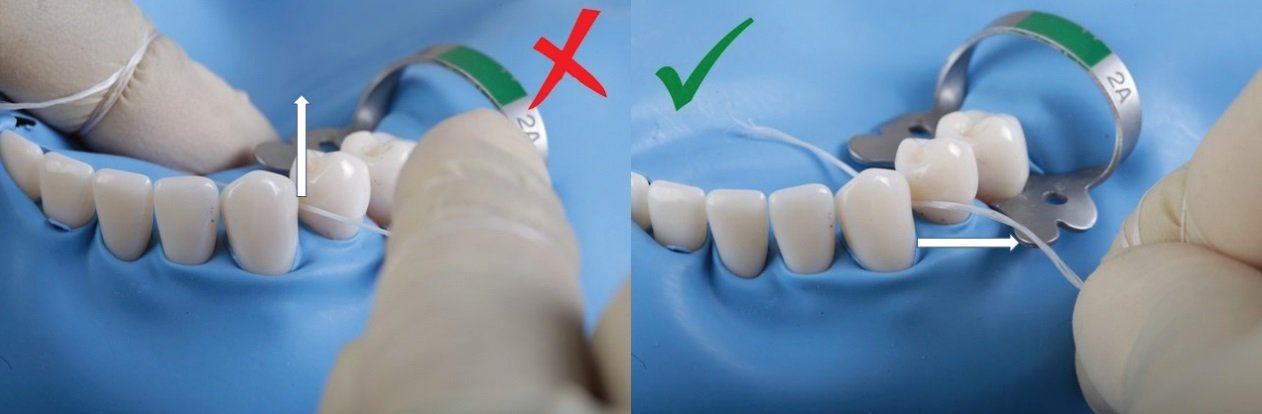
Fig. 3.146, 3.147: After the dam has been pushed interdentally, do not pull the floss out upwards, as this may cause the dam sheet to pull out with it. Instead, it helps to slide the floss along its length, either bucally or lingually. This ensures that the dam stays secure in its place.
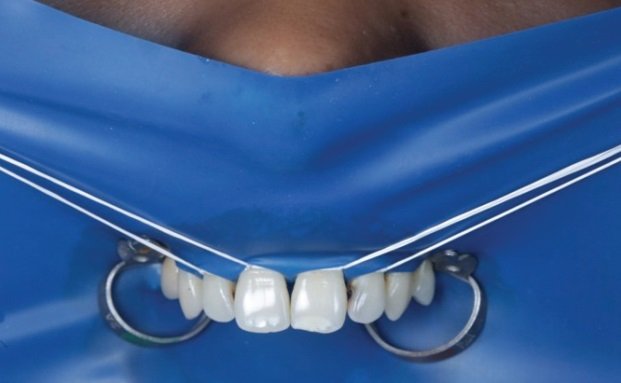
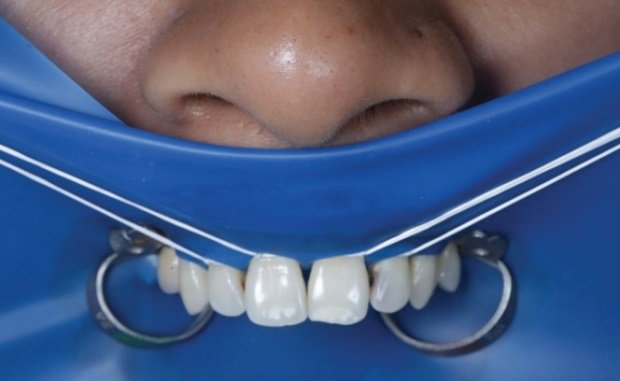
Fig. 3.148, 3.149: A simple fold of dam sheet below patient’s nose can keep the airway free from obstruction by the dam sheet, thereby improving patient comfort and acceptance.


Fig. 3.150, 3.151: After removal from patient’s mouth, check the rubber dam sheet thoroughly against a light source (left), as small pieces can tear and remain stuck in areas of tight interdental contacts (right).
ISOLATION IN VARIOUS CLINICAL SCENARIOS
When performing rubber dam isolation, there are multiple clinical possibilities. Although it is impossible to cover every scenario in this chapter, the most common ones have been discussed with clinical cases.
ISOLATION OF A SINGLE TOOTH

Fig. 3.152: As the name suggests, here one tooth alone is isolated from the rest of the hard and soft tissues of the oral cavity.
Indications
- When performing procedures on the occlusal surface of a single tooth that has no interproximal contacts.
- When performing endodontic treatment for teeth with no proximal caries.
Advantages
- It is easy to perform.
- It is less time consuming.
- Can be achieved without chair-side assistance.
Disadvantages
- Access is restricted.
- It can be difficult to gauge the correct axial orientation of the tooth.
- Leakage control can be more complicated.
- Dam inversion under the clamp is often difficult.
- There is increased pressure on the clamp, with possibility of it breaking or jumping out.
MODIFIED SINGLE TOOTH ISOLATION

Fig. 3.153: Here an additional clamp is placed on top of the dam (without hole) on a tooth anterior to the one being treated. This improves orientation and access to the target tooth.
ISOLATION OF MULTIPLE TEETH
This is preferred in most situations.
Indication
- When performing procedures on the occlusal and/or proximal surfaces of multiple teeth in the same quadrant or arch.
Advantages
- It offers better axial orientation of teeth with improved access to the work field.
- It provides absolute isolation with relative ease, as dam inversion is fairly easy to accomplish.
- There is a reduced possibility for clamp jumping.
Disadvantages
- It is often more time-consuming, as compared to single tooth isolation procures.
- Placement protocols are relatively more elaborate.
- More than one clamp, along with accessories like wedjets, liquid dam, etc. may be required .
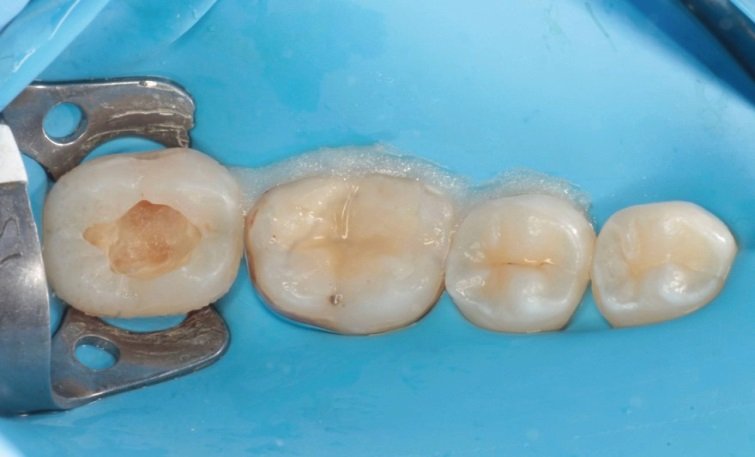
Fig. 3.154: Multiple tooth isolation.
ISOLATION FOR REMOVAL OF OLD RESTORATIONS
It is recommended that rubber dam be placed prior to removal of any old restorations.

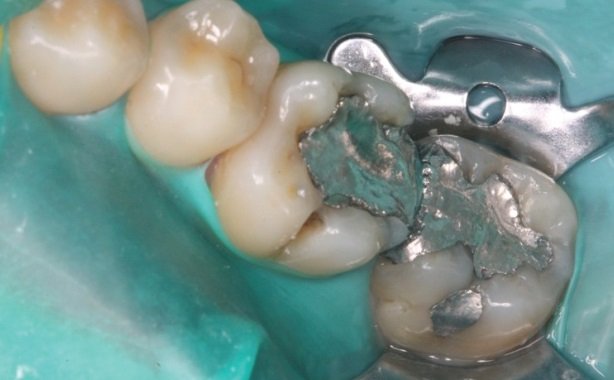
Fig 3.155, 3.156: This is especially true for amalgam, which emits mercury vapors upon grinding. Additionally, secondary caries under amalgam restorations are often in close approximation with pulpal tissues and in the unfortunate episode of pulp exposure, rubber dam isolation helps protect the tooth from salivary contamination.
Even when old composite materials are being removed, nanoscale particles are released, warranting the need for dam isolation.
ISOLATION FOR PROXIMAL CARIOUS LESIONS
Class II caries with supra-gingival margins
In these cases, rubber dam placement should be performed at the start of the procedure itself. This is because, it is important to protect the interproximal surface of the adjacent tooth or teeth when removing interproximal carious tissue from the tooth being treated.

Fig. 3.157: To achieve this, a matrix band retained with an interproximal wedge is recommended
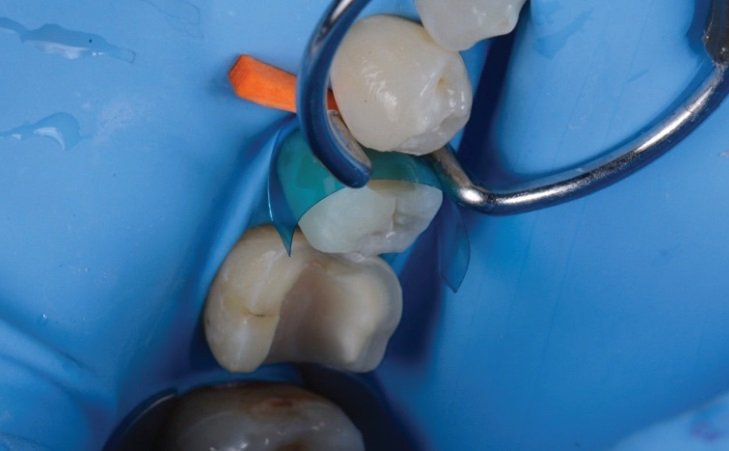
Fig. 3.158: Additionally, a ring can be used for building the correct proximal contacts and contours.
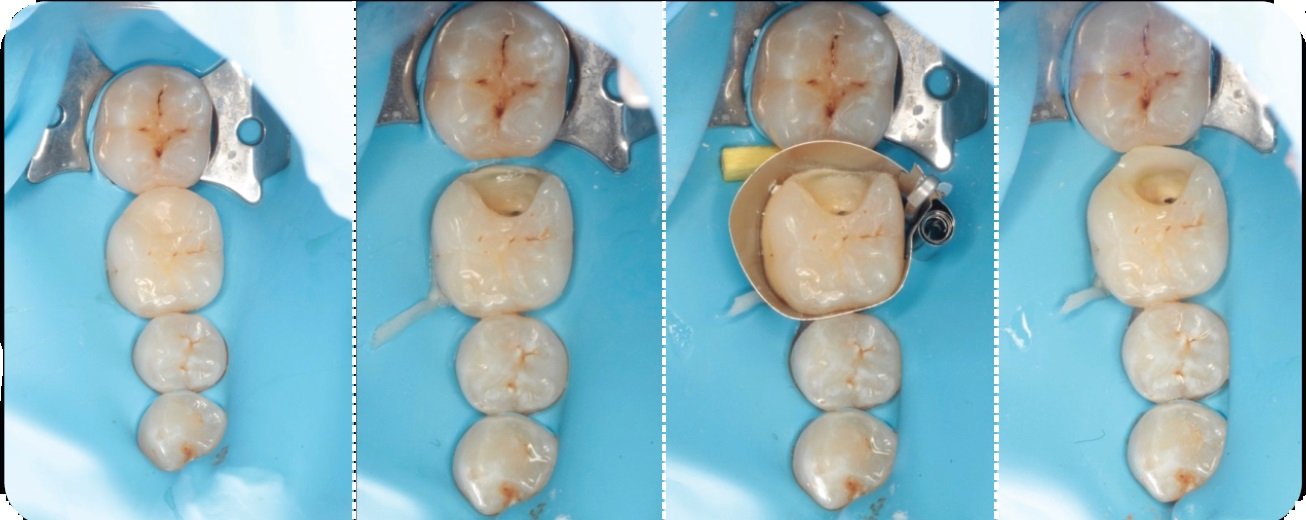
Fig. 3.159-3.162: In cases where the carious margin is very close to subgingival tissue, it helps to place the rubber dam clamp on a tooth distal to the one being treated. This allows for the matrix band to be positioned on the tooth in question with relative ease and without any interference from the clamp.
Class II caries with deep sub-gingival margins
One of the more challenging cases in everyday dentistry involves deep class II cavities, especially ones where caries extend subgingivally.
In such situations, placement of a conventional matrix (e.g. Tofflemire/Automatrix) or even a sectional matrix (e.g. Palodent) over the rubber dam can be challenging.
These cases require ‘Deep Marginal Elevation’ (DME) or ‘Margin Relocation’ which involves raising the restorative margin to an equigingival or supragingival location, before commencing any restorative and/or endodontic procedures.
Steps in DME
It is essential to start with a preoperative analysis (clinical and radiographic), in order to determine:- The restorability of the tooth, and
- Whether a surgical crown lengthening is needed or not.

Fig. 3.163: If the case is suitable for DME, the rubber dam assembly is placed with the clamp on a tooth distal to the one being treated.
Fig. 3.164: Next, the gingival margin is retracted using a floss tie (explained on page 88). Teflon tape or retraction cord is used if the proximal gingival margin requires further retraction.
Fig. 3.165: Following this, all infected caries is carefully removed from the floor and adjacent walls using hand instruments (spoon excavator) and/or slow speed burs with utmost care to prevent iatrogenic pulpal exposure (if vital).
Fig. 3.166: The Automatrix or Garrison matrix is then adapted to the tooth. Next, wedge is placed interdentally, in order to secure the matrix band and to adapt it to the tooth while ensuring a leak proof margin.
Fig. 3.167: Regular bonding procedures are then performed to relocate the margin coronally.
Following these pre-prosthetic procedures, crown preparation for reconstruction can be initiated.
In cases where caries is present on the distal aspect of the terminal tooth in the arch, the ‘double matrix’ or ‘matrix-in-matrix’ technique can be employed to restore the lesion.
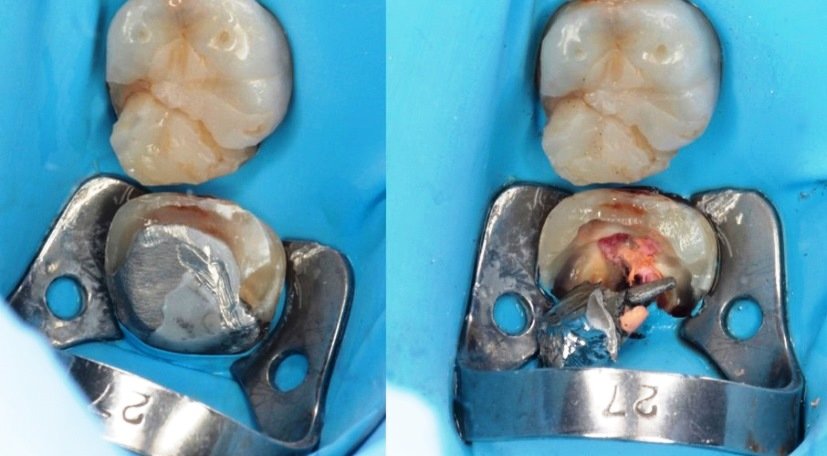
Fig. 3.168, 3.169: Note the presence of a metal cast post and core assembly with sub-ginigval caries along the distal margin.
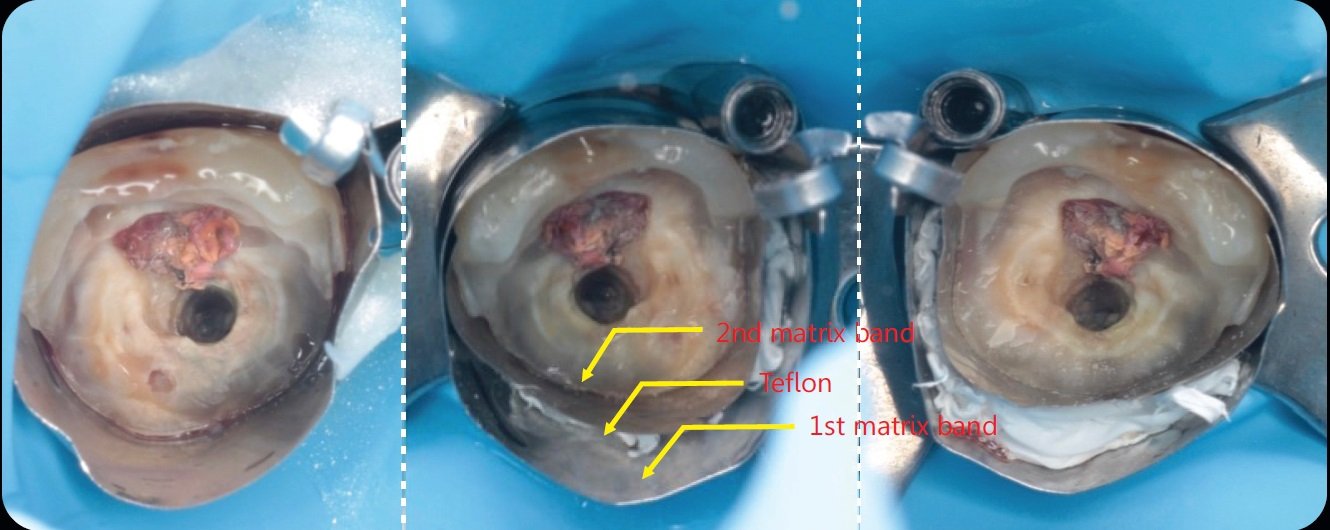
Fig. 3.170-3.172: In the double matrix technique, the first matrix should be stabilized first followed by the second matrix band that is placed inside the first one and pushed. Following this, Teflon is squeezed between the two matrices to seal the gap and provide pressure adaptation along the distal margin of the tooth.
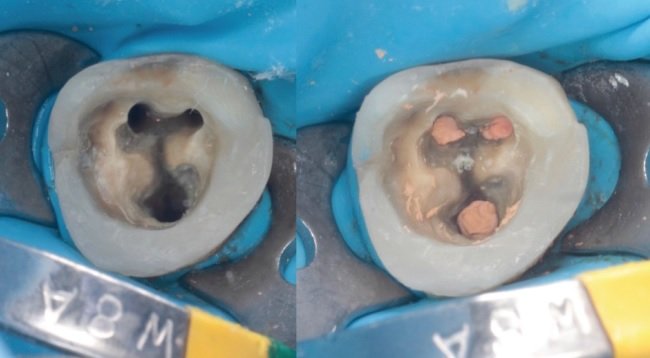
Fig. 3.173, 3.174: Conventional bonding procedures are then undertaken to restore the missing distal wall.
Isolation of a deep class II cavity requiring surgical crown lengthening and immediate deep marginal elevation.

Fig. 3.175-3.177: In situations where deep margin elevation is to be performed in conjunction with a surgical crown lengthening procedure, he rubber dam assembly is placed while the flap is still open. This provides the desired access and isolation to produce predictable results with relative ease. In this case, the matrix-in-matrix technique was used to restore the wall with composite and the tooth was subsequently restored with an overlay type prosthesis.
ISOLATION OF CERVICAL AREAS
Prepared cervical margins or cervical lesions can be isolated using clamps with small jaws, e.g. 212 or B4. Additionally, retraction cord, Teflon or floss ties can be used to retract gingival tissue in cases where sub-gingival isolation is required.
If absolute isolation cannot be achieved, materials that are less sensitive to moisture, like Biodentine or Geristore or Glass Ionomer cement should be used for restoration.

Fig. 3.178: A 212 clamp used for isolation of a lateral incisor showing sub-gingival defect from external root resorption. In such cases, where an external approach is used to repair the defect in conjunction with a muco-periosteal flap, absolute isolation is of paramount importance for a successful outcome. Teflon or gingival retraction cords should be used to improve isolation when indicated.
ISOLATION FOR POST AND CORE RESTORATION
In cases with compromised ferrule, post space preparation for cast posts or bonding of prefabricated fiber posts should be performed under rubber dam isolation, in order to achieve the most optimal bond with radicular dentin.

Fig. 3.179: In this case, a 212 clamp was sectioned and used to isolate the severely compromised left central incisor. Optionally, a number 0, 1 or B4 clamp can be used provided it can be stabilized over the tooth structure.
Acknowledgement
All the authors of this article would like to thank Dr. Tousif Iqbal Nathani and Dr. Juan Gonzalo Olivieri for their invaluable contribution in making of this article.
This article is a direct extract from the book by Dr. Moez Khakiani, titled Clinical Fixed Prosthodontics- Master Volume. It is a color atlas suited for clinicians who wish to expand their horizons in advanced prosthodontics. It has over 400, pages, and over 2500 color illustrations distributed over 25 chapters. It is a MUST-HAVE guide for clinical prosthodontics, including chapters like master level occlusion, full mouth rehabilitation, porcelain veneers, table top prostheses, implant dentistry, digital dentistry, etc.
Why don’t you give this book a try?
It is available for preview and purchase on www.mikdental.in, or you could connect on +91 9833400664 for the same.
Disclaimer from Guident
The views and opinions expressed in articles published in Guident are solely those of the authors and do not necessarily reflect the views of the editors, the editorial board or the publisher, Ivory India. Guident does not endorse any product, technique or treatment described. Clinical content is intended for qualified dental and medical professionals and is not a substitute for individual clinical judgement. Guident, its editors and the publisher accept no liability for any consequence arising from the use of information published in the journal.
How to cite this article
Dr. Moez I. Khakiani, Dr. Usha Dadlani, Dr. Aatif Iqbal Nathani. Isolation in Clinical Dentistry: Part-5. Guident. 2024 Apr;17(5). Available from: https://guident.in/articles/general/isolation-in-clinical-dentistry-part-5.html


