
Isolation in Clinical Dentistry: Part-2
MIK Dental, Mumbai, India
4. OPTRAGATE
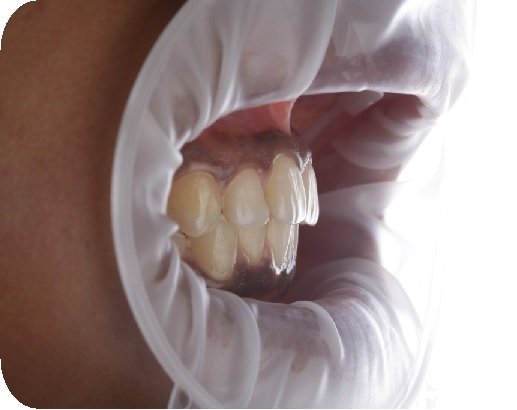
Fig. 3.38: Optragate is a latex-free lip and cheek retractor from Ivoclar Vivadent.
Technique
Optragate consists of two oval rings and is to be placed such that its thicker ring is positioned within the muco-buccal fold, while the thinner ring remains outside the mouth.
It is available in three sizes. For the appropriate size selection, the inner ring should be about 2 cm wider than the inter-commissure distance with the lips in a relaxed position.
Though the smallest size (6 cm) usually fits almost all patients, the regular (7 cm) can be used for large adult mouths and the junior (4.5 cm) for pediatric use.
Advantages
- It helps retract soft tissue and provides excellent visibility of the operating field.
- Its double oval frame design assists the patient in keeping the mouth open during long procedures.


Fig. 3.39, 3.40: Optragate can be used to help retract the lip and cheek during tooth preparation (left) as well as impression making (right).
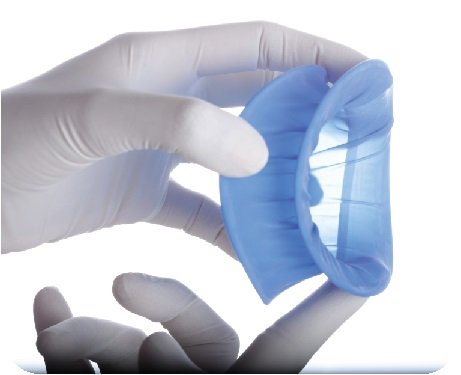
Fig. 3.41: OptraDam is a modification of the OptraGate with a rubber dam sheet. It comes in 2 sizes – small and regular
5. OPTRADAM PLUS

Fig. 3.42: Holes are punched according to the pre-marked dots on the dam.
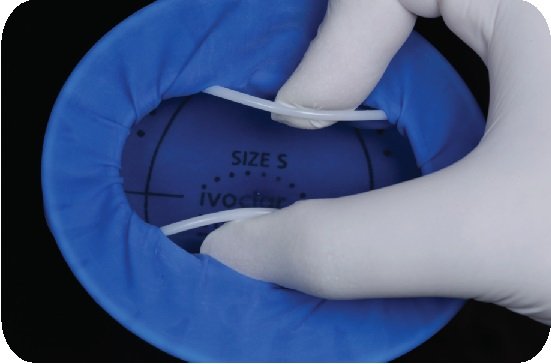
Fig. 3.43: The inner ring is held and compressed vertically
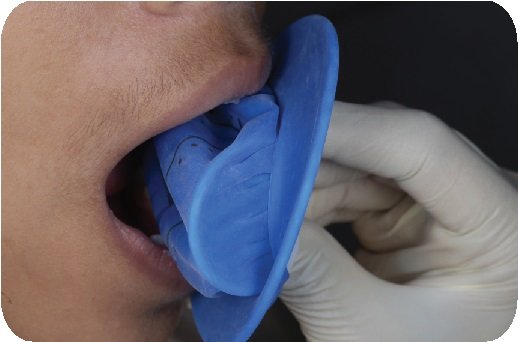

Fig. 3.44, 3.45: The inner ring of the Optradam is inserted into the buccal vestibule while still holding and compressing the ring vertically.

Fig. 3.46: Slowly, the ring is released vertically, which now fits into the vestibular space.

Fig. 3.47: Following this, all holes are then passed over their specific teeth and if required, floss is used to push the sheet around tight interdental contacts
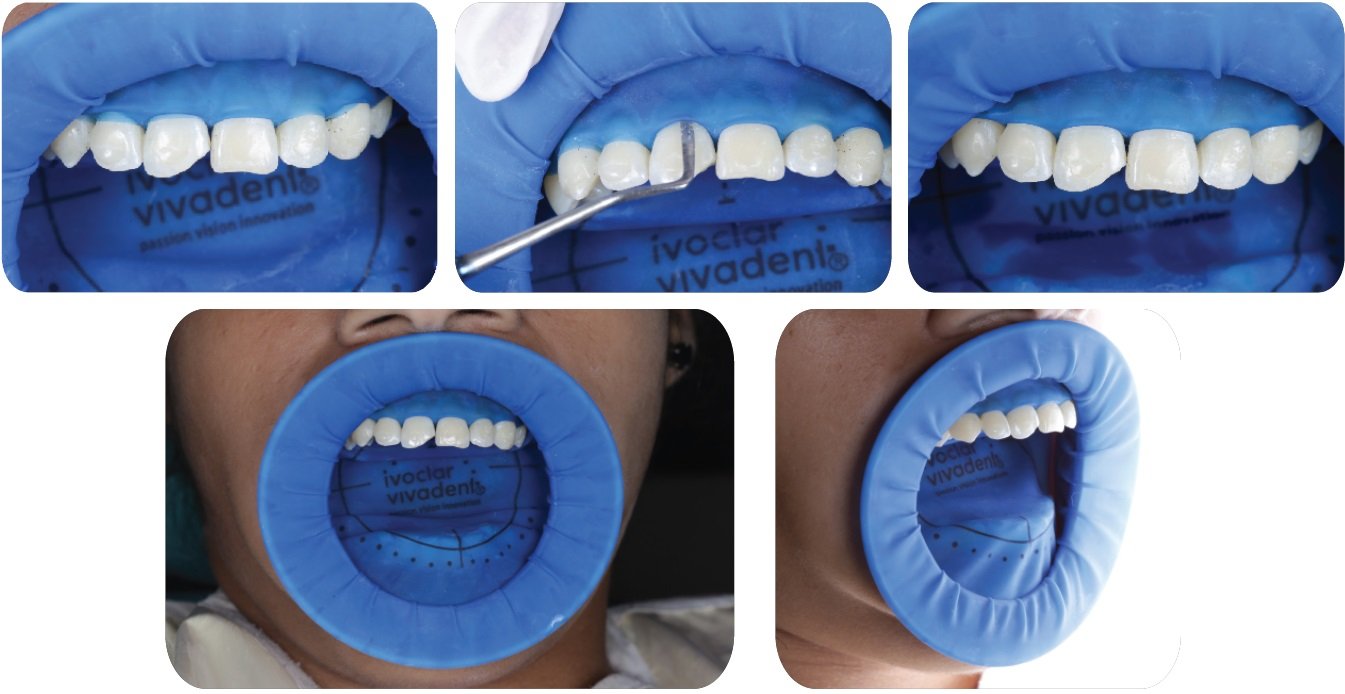
Fig. 3.48-3.52: Using a flat blunt instrument, the margins are then inverted. Air spray from a 3-way syringe can be used to aid inversion.
Advantages
- Very easy to use, especially for beginners.
- It provides excellent retraction and access for anterior segments, even without the use of clamps.
Drawbacks
- Retraction for posterior teeth is inferior as compared to the traditional rubber dam.
- The inner ring can sometimes feel uncomfortable to the patient.
- Radiographs are difficult to take.
- The use of clamp is necessary for posterior isolation, to retract the sheet and hold it in place, as shown in Fig. 3.53.

Fig. 3.53: When used for posterior isolation, clamps are usually required to keep the dam in place
D. RUBBER DAM ISOLATION
This is the gold-standard for isolation. It is the only technique that can provide ‘absolute’ isolation with fulfillment of all requirements. The use of rubber dam in dentistry dates over a hundred years. It was first introduced by Dr. Stanford Christie Barnum in 1894 and continues to be a boon in the world of dentistry.
Advantages
- It provides a clean, dry and moisture-free operating field.
- It allows utmost access and visibility of the target area.
- It increases efficiency in dental procedures with reduced working time.
- It discourages unnecessary conversation and frequent rinsing by the patient.
- Ideal properties of dental materials can be achieved when used under absolute isolation.
- It protects the patient from chemical injury, and/or accidental instrument aspiration.
- It allows greater control of cross-infection.
Indications
- For use with procedures or materials that are technique sensitive, e.g. direct, indirect bonding.
- Can be used for single tooth isolation, quadrant isolation and also full arch isolation.
- Ideally, all bonding and endodontic procedures should be done under rubber dam isolation.
Drawbacks
- There is a learning curve for mastering the correct clamp selection and placement technique.
- Additional time is required in explaining its need to the patient and for the actual placement of the dam.
- There is a possibility of clamp displacement or fracture, with associated fear of aspiration, prosthesis margin chipping, and/ or harm to gingival tissues.
Contraindications
- There are no absolute contra-indications to the use of a rubber dam. However, it should be used with caution for asthmatic patients or mouth breathers. This can be managed by creating an opening in the rubber dam sheet allowing the patient to feel more comfortable.
- Traditionally, it was contraindicated in patients with latex allergies, but this can be managed with the use of latex-free dam sheets that are easily available.
RUBBER DAM EQUIPMENT
Rubber dam equipment primarily consists of:
- Rubber dam sheet
- Rubber dam templates
- Rubber dam punch
- Frame
- Clamps
- Clamp forceps
- Accessories like floss, wedjets, flowable resin-based gingival barrier, etc.
a. RUBBER DAM SHEET
There are multiple sheet options available in the market and choosing the correct sheet for the clinical procedure at hand is paramount to success. Following factors need to be considered when choosing the dam sheet:
- Tear strength
- Material
- Size
- Thickness
- Surface
- Color
Tear strength
High tear strength is one of the most essential requirements of a rubber dam, especially for beginners. Sheets that tear easily, can be a source of increased operator frustration and premature quitting.
To maintain rubber dam properties, it is important for them to be stored in a cool, dry, ventilated place (5ºC to 27ºC).
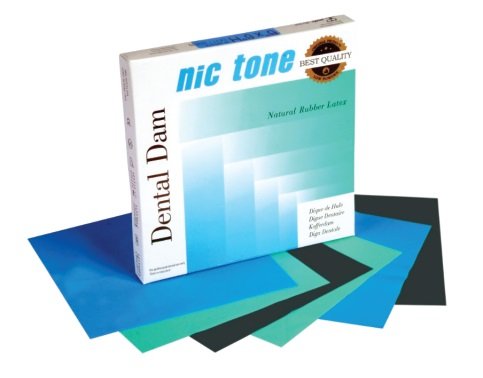
Fig. 3.54: In our opinion, Nic Tone manufactures sheets with the highest tear strength
Material
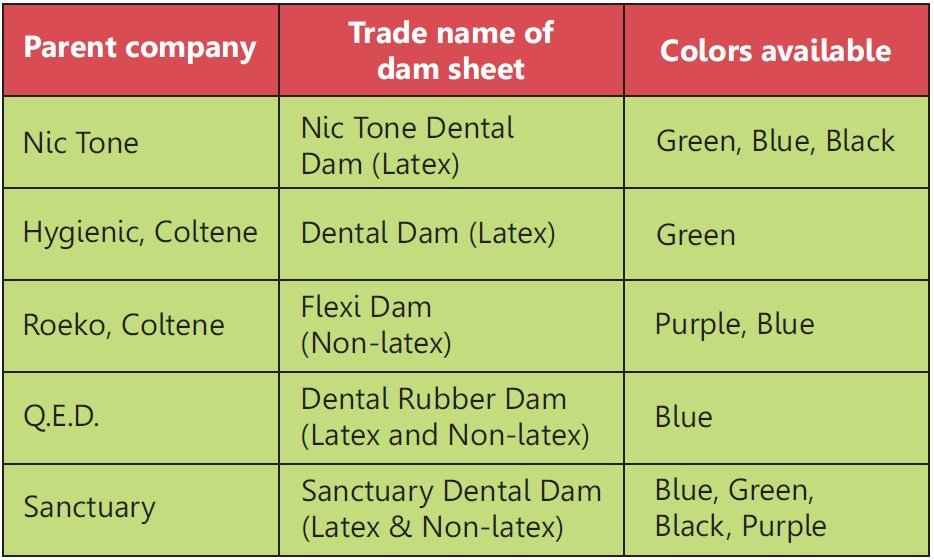
The most commonly used rubber dam sheets are made of latex, as it provides ideal properties. But as stated before, non-latex or latex-free rubber dam sheets are also easily available, as shown in Fig. 3.55.

Fig 3.55
Size
Mainly two sizes of rubber dam sheets are available: 12.5 x 12.5 cm (5x5 inch) or 15 x 15 cm (6x6 inch) and is to be chosen on the basis of size of the patient’s mouth or your personal preference. In general, smaller sheets are recommended for endodontics, pediatric dentistry and procedures involving anterior teeth.
Thickness
Sheets are available in five different thickness, as described in the table below. Usually, a medium thickness is recommendable for most restorative and endodontic procedures. A heavy dam is used in cases where more gingival retraction is desired and in cases with wide interdental spacing between teeth.

Surface
There are two sides to the rubber dam sheet, namely, the shiny side and the matte side. Preferably, the shiny side should face the patient’s mouth and the matte towards the operator. This helps in better visibility and reduced light reflection off the dam surface.

Fig. 3.56: Matt surface helps in dental photography as flashlight does not reflect heavily from its surface. Image courtesy, Dr. Sara Madeira, Portugal
Color
Rubber dam sheets are available in different colors, such as blue, green, purple, black, etc. Choice of color is purely upon the operator’s personal taste and is influenced by trends or fashion. In general, a bluecolored sheet is best suited for dental photography, as it is pleasing to the eye, it creates a contrast with the white and pink of the oral cavity, it increases visibility and reflects the correct amount of light.
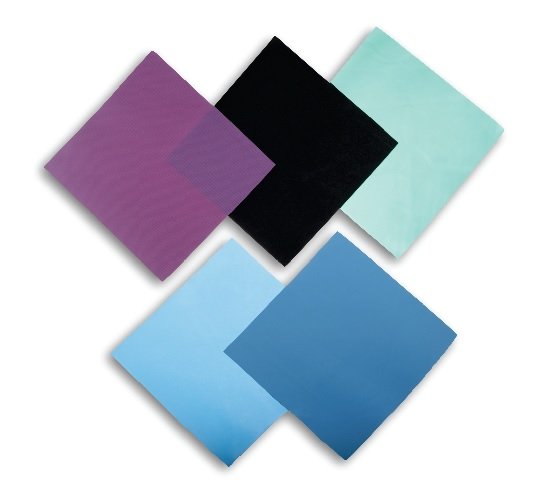
Fig. 3.57: Dam sheets of various colors.
b. RUBBER DAM TEMPLATES OR TEMPLATE STAMPS
These are pre-fabricated guides for marking punch holes on the rubber dam sheet. They are extremely easy to use as long as the dental arrangement of teeth is near ideal. In cases with crowding or malalignment, such templates should not be used and markings should be made directly over teeth intra-orally.
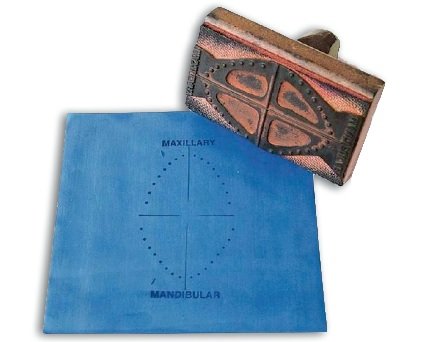
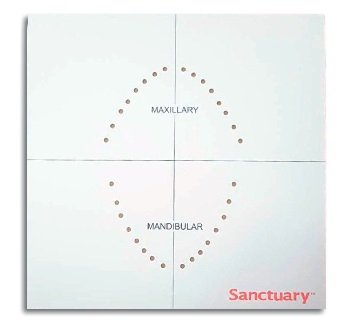
Fig. 3.58, 3.59: Left: Rubber dam stamp; Right: Rubber dam template
c. RUBBER DAM PUNCH or PERFORATOR
This is a precision instrument with a small metal dial harboring five to six holes of different sizes along with a sharp ended plunger to make perforations in the rubber dam sheet.
Hole 1: Lower anteriors (smallest)

Fig 3.60, 3.61: Holes on the instrument range from 0.5 mm up to 2.5 mm in diameter.
Hole 2: Upper anteriors
Hole 3: Upper and lower canines and premolars
Hole 4: Upper and lower molars
Hole 5: Large molars and anchor teeth (largest)
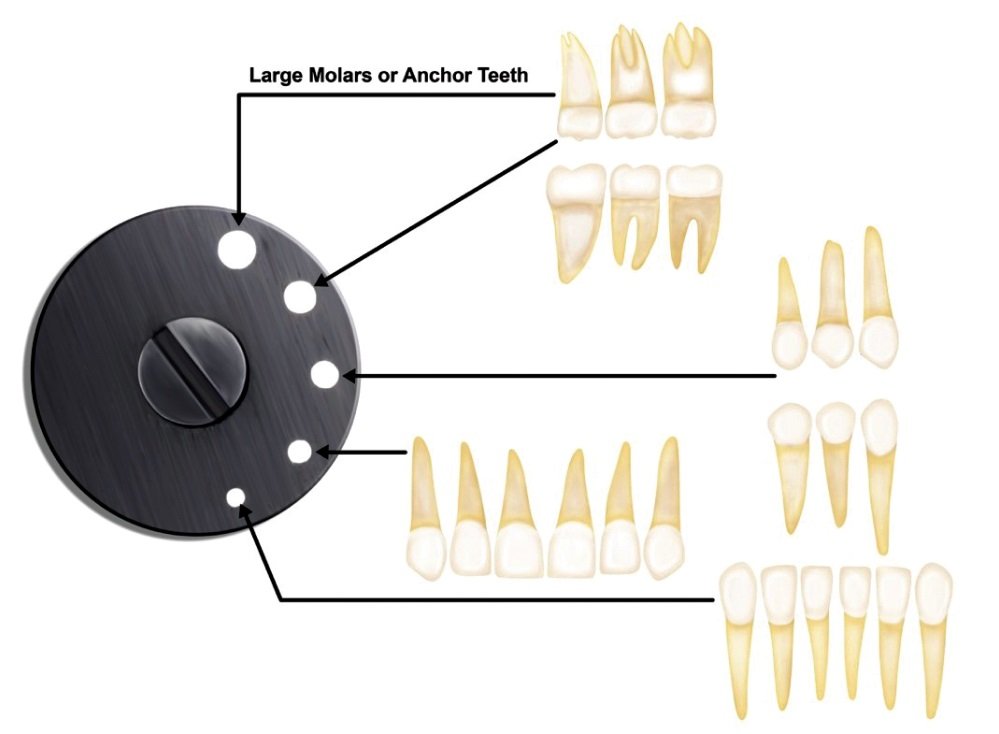
Fig. 3.62: Based on the tooth or teeth in concern, the wheel of the punch is to be rotated in order to create an appropriate size hole in the dam sheet.
Choose smaller diameter holes to ensure tight adaptation around teeth, while adequately retracting the interdental papilla as well. However, punch a larger hole for the distal most (anchor) tooth, so as to allow for the clamp to pass through without tearing the dam sheet.
d. FRAME
Frame is the outer limit of the dam assembly and helps maintain the rubber dam in place. It has ‘hook like’ projections onto which the dam sheet is to be stretched and secured, with the primary purpose of preventing the sheet from collapsing. Additionally, it also helps retract soft tissues and improve the overall access to the work field.
Design: Rubber dam frames are available in two main sizes: Pediatric (11.5 x 9.5 cm) and adult (12.8 x 10.4 cm), in either stainless steel or plastic. Typically, they are quadrangular or round in design.
The Young’s frame (Fig 3.63, 3.64) is the most frequently used design in dentistry.
Advantages
- Owing to its open ended design, it is very comfortable even during long procedures .
- It can be heat sterilized and thus has a long life span.
- It can be placed inverted, so as to provide additional retraction for access to sub-gingival preparation margins when working on maxillary anteriors, as shown in Fig 3.206-3.210.
Disadvantage
- It has to be removed for taking radiographs.

Fig. 3.63, 3.64: The Young’s frame. Fig. 3.65, 3.66: The Nygard-Ostby frame. Left: U shaped; Right: O shaped.
- The Nygard-Ostby frame (Fig 3.65, 3.66) is another commonly used design, which is ‘O’ or ‘U’ shaped and made in plastic with 8 or 11 projections to hold the rubber dam sheet.
Advantages
- Being anatomically contoured, it adapts better on the face.
- Does not have to be removed while taking a radiograph.
Disadvantages
- With the ‘O’ design, the rubber dam sheet tends to come too close to the patient’s face, making it difficult to breath.
- It cannot be heat sterilized and thus has a short life span.

Fig. 3.67: The Sauveur frame, also called Le Cadre Articulated frame, is a curved, plastic design with a hinge that allows for the frame to be folded back when taking radiographs.
e. CLAMPS

Clamps are used to anchor rubber dam sheets and are usually placed on the distal most tooth or teeth of the operating field. A typical clamp with its parts is described in Fig. 3.68 above.

Fig. 3.69: Although clamps are usually made of stainless steel, they are also available in medical grade polymer materials, e.g. SoftClamp from Kerr. These clamps have reduced adioopacity and thus cast a far less obvious shadow on radiographs. They are most recommended for use on teeth with ceramic prostheses, as they reduce the possibility of damage to the brittle porcelain margins.
Acknowledgement
All the authors of this article would like to thank Dr. Tousif Iqbal Nathani and Dr. Juan Gonzalo Olivieri for their invaluable contribution in making of this article.
Declaration:
This article is a direct extract from the book by Dr. Moez Khakiani, titled Clinical Fixed Prosthodontics- Master Volume. It is a color atlas suited for clinicians who wish to expand their horizons in advanced prosthodontics. It has over 400, pages, and over 2500 color illustrations distributed over 25 chapters. It is a MUST-HAVE guide for clinical prosthodontics, including chapters like master level occlusion, full mouth rehabilitation, porcelain veneers, table top prostheses, implant dentistry, digital dentistry, etc.
Why don’t you give this book a try?
It is available for preview and purchase on www.mikdental.in, or you could connect on +91 9833400664 for the same.
Disclaimer from Guident
The views and opinions expressed in articles published in Guident are solely those of the authors and do not necessarily reflect the views of the editors, the editorial board or the publisher, Ivory India. Guident does not endorse any product, technique or treatment described. Clinical content is intended for qualified dental and medical professionals and is not a substitute for individual clinical judgement. Guident, its editors and the publisher accept no liability for any consequence arising from the use of information published in the journal.
How to cite this article
Dr. Moez I. Khakiani, Dr. Usha Dadlani, Dr. Aatif Iqbal Nathani. Isolation in Clinical Dentistry: Part-2. Guident. 2024 Jan;17(2). Available from: https://guident.in/articles/general/isolation-in-clinical-dentistry-part-2.html


