Shade Selection and Shade Communication: Part-1
MIK Dental, Mumbai, India
This article is a direct extract from the book by Dr. Moez Khakiani, titled Clinical Fixed Prosthodontics- Master Volume. It is a color atlas suited for clinicians who wish to expand their horizons in advanced prosthodontics. It has over 400, pages, and over 2500 color illustrations distributed over 25 chapters. It is a MUST-HAVE guide for clinical prosthodontics, including chapters like master level occlusion, full mouth rehabilitation, porcelain veneers, table top prostheses, implant dentistry, digital dentistry, etc.
Why don’t you give this book a try?
It is available for preview and purchase on www.mikdental.in, or you could connect on +91 9833400664 for the same.
While establishment of a functional occlusion is the foundation of our work, the glamour quotient comes from aesthetic treatments that are performed within the visible window.
Roots of aesthetic dentistry lie in our relentless efforts at replicating nature in form and color. The overall appearance of a tooth is the interplay between the spatial arrangement of the light source, the observer and the tooth.
UNDERSTANDING COLOR
Without light, color does not exist. It is the interaction of light with the object that allows for a particular color to be perceived.
When light hits a tooth, most of it gets absorbed or transmitted. However, the wavelengths that are reflected back, enter the eye where they are perceived by specialized receptor cells in the retina, called rods and cones. This information then gets recognized by the brain as a specific color.
The perception of color is influenced by three factors:
- Physical properties of the object.
- Nature of the incident light.
- Subjective assessment by the observer.

Fig. 3.1: Process of color perception.

Fig. 3.2: Shade perception under varying light sources. Note, the considerable change in the perceived tooth color when exposed to different light conditions. This is a critical factor, as
shade selection in the clinic and shade matching in the laboratory may not be done under the same light source- leading to a shade mismatch.
When a clinician (observer) is selecting the shade of a tooth (object); two out of the above three factors are constant. However, the one variable that massively influences shade selection, is the nature of incident light.
Natural day light (morning-noon) is considered to be the most appropriate for dentistry and thus, it is routinely advised to perform shade selection around this time of the day and near a window.
However, the color of sunlight is never constant and changes with time of the day, month and weather conditions. If the light source changes, the light reflected from the tooth changes too and as a result, a different color is perceived by the human eye.
As natural day light cannot be available at all times, special color corrected lights are manufactured which help simulate daylight, thereby allowing for accurate shade perception, e.g. Rite-Lite 2.

Fig. 3.3: Rite-Lite 2: Color corrected light. This allows for standardization of the incident light, thereby adding predictability to the shade selection process.
ATTRIBUTES OF COLOR
There are three attributes by which color can be identified and communicated.Hue is what one normally thinks of when describing color: red, purple, blue, etc.

Fig. 3.4: Hue
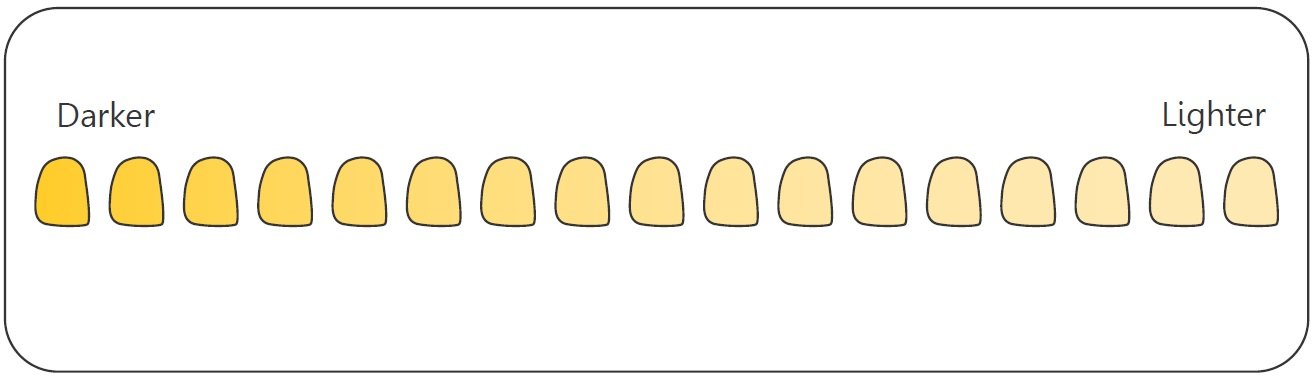
Fig. 3.5: Chroma
Value describes how bright or dull a color is. If a material reflects most of the light falling on its surface, it appears bright, i.e. it has a high Value. Conversely, a dark object absorbs most of the incident light and appears dull, i.e. it has a low Value.
Between the two extremes (white and black), a gradation of Value exists and is termed as the ‘grey-scale’. Value is the only dimension of color that can exist by itself and is the most important determinant when selecting a shade in the patient’s mouth.

Fig. 3.6: Value

Fig. 3.7: Value, Chroma and Hue are those characteristics on the basis of which all natural shades can be uniquely defined. The entire color spectrum can be represented as a sphere; wherein the natural tooth shades fall into a small section in the yellowred range.
TECHNIQUES FOR SHADE SELECTION

SHADE GUIDES
The role of a shade guide is to help standardize the perception of tooth color and facilitate it’s communication with the dental laboratory. Although, shade guides are not exact replicas of natural teeth, they have a similar distribution in the color space, allowing the technician to fabricate prostheses that can blend in, amongst the rest of the dentition.
In order to avoid confusion, it is important that the clinician and the laboratory technician use the same shade guide.
Few of the commonly used shade guides are described below:
A. VITA CLASSICAL A1-D4: CONVENTIONAL SET-UP
This shade guide was introduced in 1956 and is yet one of the most routinely used guides for shade selection across the globe.
The guide consists of 16 shade tabs that are clustered into four groups on the basis of their ‘hue’.
These are designated by the following letters:
A= Reddish-brownish B= Reddish-yellowish
C= Greyish shades D= Reddish grey

Fig. 3.8: VITA classical A1-D4: Conventional set-up showing the three attributes of color as shaded boxes above the guide.
Each group is further sub-divided into numbers (1, 2, 3, 3.5, 4) which indicate the ‘Chroma and Value’ of the shade tab.
A smaller denominator, e.g. 1 indicates a shade which is high in Value and low in Chroma (brighter and lighter), while a higher denominator, e.g. 4 indicates a shade which is low in Value and high in Chroma (duller and darker).
Protocol for use
With the VITA classical system, the shade selection is a one or two step procedure; where all three attributes (i.e. Hue, Chroma and Value) are decided upon simultaneously.

Fig. 3.9: The technique requires the clinician to hold the shade guide at an arm’s distance and move it horizontally across the reference tooth (like a typewriter). The aim here, is to eliminate the obvious misfit tabs and narrow down to 1 or 2 tabs which appear to be the most probable matches.

Fig. 3.10: The chosen tabs are then removed from the guide and evaluated by holding them next to each other against the reference tooth. B2 and B3 were chosen for this patient.
The final shade is communicated to the laboratory as B3. Note, the incisal edge of the shade tab is facing the incisal edge of the reference tooth.
In case you are unable to finalize between the two chosen tabs, choose the lighter and less chromatic one. This is because, it is comparatively easy to modify the shade of such a prosthesis with the help of extrinsic stains (prior to the final glaze cycle).
Drawbacks
- The VITA classical shade guide is primarily ‘Hue’ based and does not adequately express the Value. While moderate inaccuracies in Chroma and Hue can go unnoticed, inaccuracy in Value is often prominent and renders the prosthesis unacceptable on aesthetic grounds.
- Shades are not uniformly distributed through the tooth color space, as shown in Fig. 3.11.
- There is no standardized difference between adjacent shades and thus, in-between shades cannot be predictably reproduced.
- There is a learning curve involved, as one has to choose from 16 shades at one go.

Fig. 3.11: In the VITA classical shade guide, the shade tabs are not equally distributed within the tooth color space. This precludes accurate shade interpolation, e.g. Shade A 2.5 cannot be achieved by mixing equal quantity of A 2 and A 3 powder.
B. VITA CLASSICAL A1-D4: VALUE BASED SET-UP
To counter the problems associated with the conventional set-up, VITA suggested a value based set-up using the same guide.
Design
The 16 shade tabs are to be re-arranged in the following sequence:
B1 A1 B2 D2 A2 C1 C2 D4 A3 D3 B3 A3.5 B4 C3 A4 C4.
Protocol for use
The same technique as mentioned for the conventional set-up is used, wherein the shade guide is moved horizontally across the reference tooth and the final shade is chosen; but with the primary focus on Value.
When determining the Value, it is advisable to squint the eyes when selecting the shade. The act of squinting reduces the amount of light that reaches the retina. This reduces stimulation of the cone cells, while the rod cells become more sensitive to the increasingly achromatic conditions. The shade that fades first has the lower value.
Although such an arrangement adds to the versatility of the shade guide, inconsistencies continue to prevail with its use.

Fig. 3.12: VITA classical A1-D4: Value based set-up.
Note: As the significance of ‘Value’ in shade selection became apparent, the successors of this shade guide were all designed to address the Value first, followed by the other attributes of color.
C. VITA TOOTHGUIDE 3D-MASTER
This shade guide was introduced in 1998, with the shade taking sequence focused around registering the Value first, followed by Chroma and finally the Hue. So in a sense, the entire shade selection sequence was reversed from that of the VITA classical protocol.
Design
This shade guide has 26 shade tabs that are organized into five primary groups that are based on Value. These groups are designated by a number: 1, 2, 3, 4 or 5

Fig. 3.13: These groups are arranged horizontally from the brightest (Value 1) on the extreme left to the dullest (Value 5) on the extreme right of the guide. All tabs within one Value group have the same level of dullness or brightness.

Fig. 3.14: The Chroma tabs are arranged vertically within each value group and the saturation increases as we move from top (lighter) to bottom (darker).
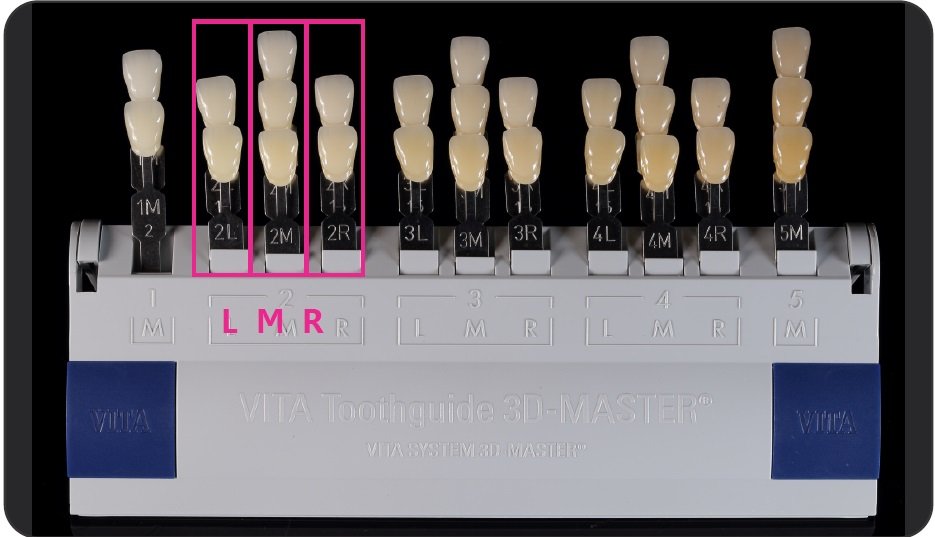
Fig. 3.15: All value groups (with the exception of 1 and 5), are arranged into three columns; L, M and R, corresponding to varying Hue. L (light) is indicative of a yellow hue, M (medium) indicates a yellow-red hue, while R (red) indicates a reddish hue.

Fig. 3.16: The VITA Toothguide 3D-MASTER showing the three attributes of color as shaded boxes above and to the right of the guide.
Protocol for use
Shade selection with this guide is a three step process:.

Fig. 3.17: STEP 1: The Value is first chosen by holding the shade guide at an arm’s distance from the tooth and by squinting the eyes. It is advisable to start the selection process from extreme ends and to eliminate the obvious misfit groups first. For this patient, Group 2 was found to have the closest Value to the reference tooth.

Fig. 3.18: Once the Value is selected, the ‘M’ column of that series is removed and fanned out (here, Group 2).

Fig. 3.19: STEP 2: The Chroma is then selected by holding all three tabs under the reference tooth.

Fig. 3.20: STEP 3: Lastly, the Hue is determined by checking whether the natural tooth is more reddish, more yellowish or similar to the shade tab selected.
The final shade for this patient was 2R2.5, which corresponds to the second Value group, the R Hue-group and the 2.5 Chroma level.
Advantages
- There is a scientific backing and sound reasoning behind the design and construction of this system. All chosen shades are arranged in a systematic sequence and are equidistant in their distribution across the tooth color space.

Fig. 3.21: The periodic and equidistant placement of the shade tabs within the color space allows intermediate shades to be chosen and reproduced by mixing equal amounts of powder from neighboring tabs.
- The guide also comes equipped with 3 bleach shades, designated by the number ‘0’. This can be conveniently clipped on and off the guide when needed.
Drawback
- The three step procedure can get confusing and time consuming, with a definite learning curve.
Disclaimer from Guident
The views and opinions expressed in articles published in Guident are solely those of the authors and do not necessarily reflect the views of the editors, the editorial board or the publisher, Ivory India. Guident does not endorse any product, technique or treatment described. Clinical content is intended for qualified dental and medical professionals and is not a substitute for individual clinical judgement. Guident, its editors and the publisher accept no liability for any consequence arising from the use of information published in the journal.
How to cite this article
Dr. Moez I. Khakiani, Dr. Mayur Dawda, Dr. Akshay Sharma. Shade Selection and Shade Communication: Part-1. Guident. 2022 Dec;16(1). Available from: https://guident.in/articles/prosthodontics/shade-selection-and-shade-communication-part-1.html